Updated October 5, 2025
Hiking in Zion National Park is arguably the best way to experience the canyon’s raw beauty and nature. While you can see a lot from the roads, immersing yourself in nature on one of the many hikes in Zion is a perfect way to disconnect and enjoy the stunning red rock formations around you.
However, you don’t need to be an expert hiker to enjoy the various trails and pathways the park has to offer. In fact, Zion is one of the best national parks for easy, family-friendly, and handicap accessible trails that we’ve ever visited. While there, we saw hikers of all ages, sizes, and abilities out and about on the trails. No matter your hiking experience, you can do it too!
In this guide, we’ll share 15 of the best, most beautiful hikes in Zion National Park for all levels of hikers, from easy, accessible trails to difficult, challenging scrambles.
15 Iconic Hikes in Zion National Park
1. Canyon Overlook: Zion’s Coolest Viewpoint Hike
- Distance: 1 mile
- Time Needed: 30 minutes to 1 hour
- Elevation Gain: 163 feet
- Difficulty: Easy/Moderate
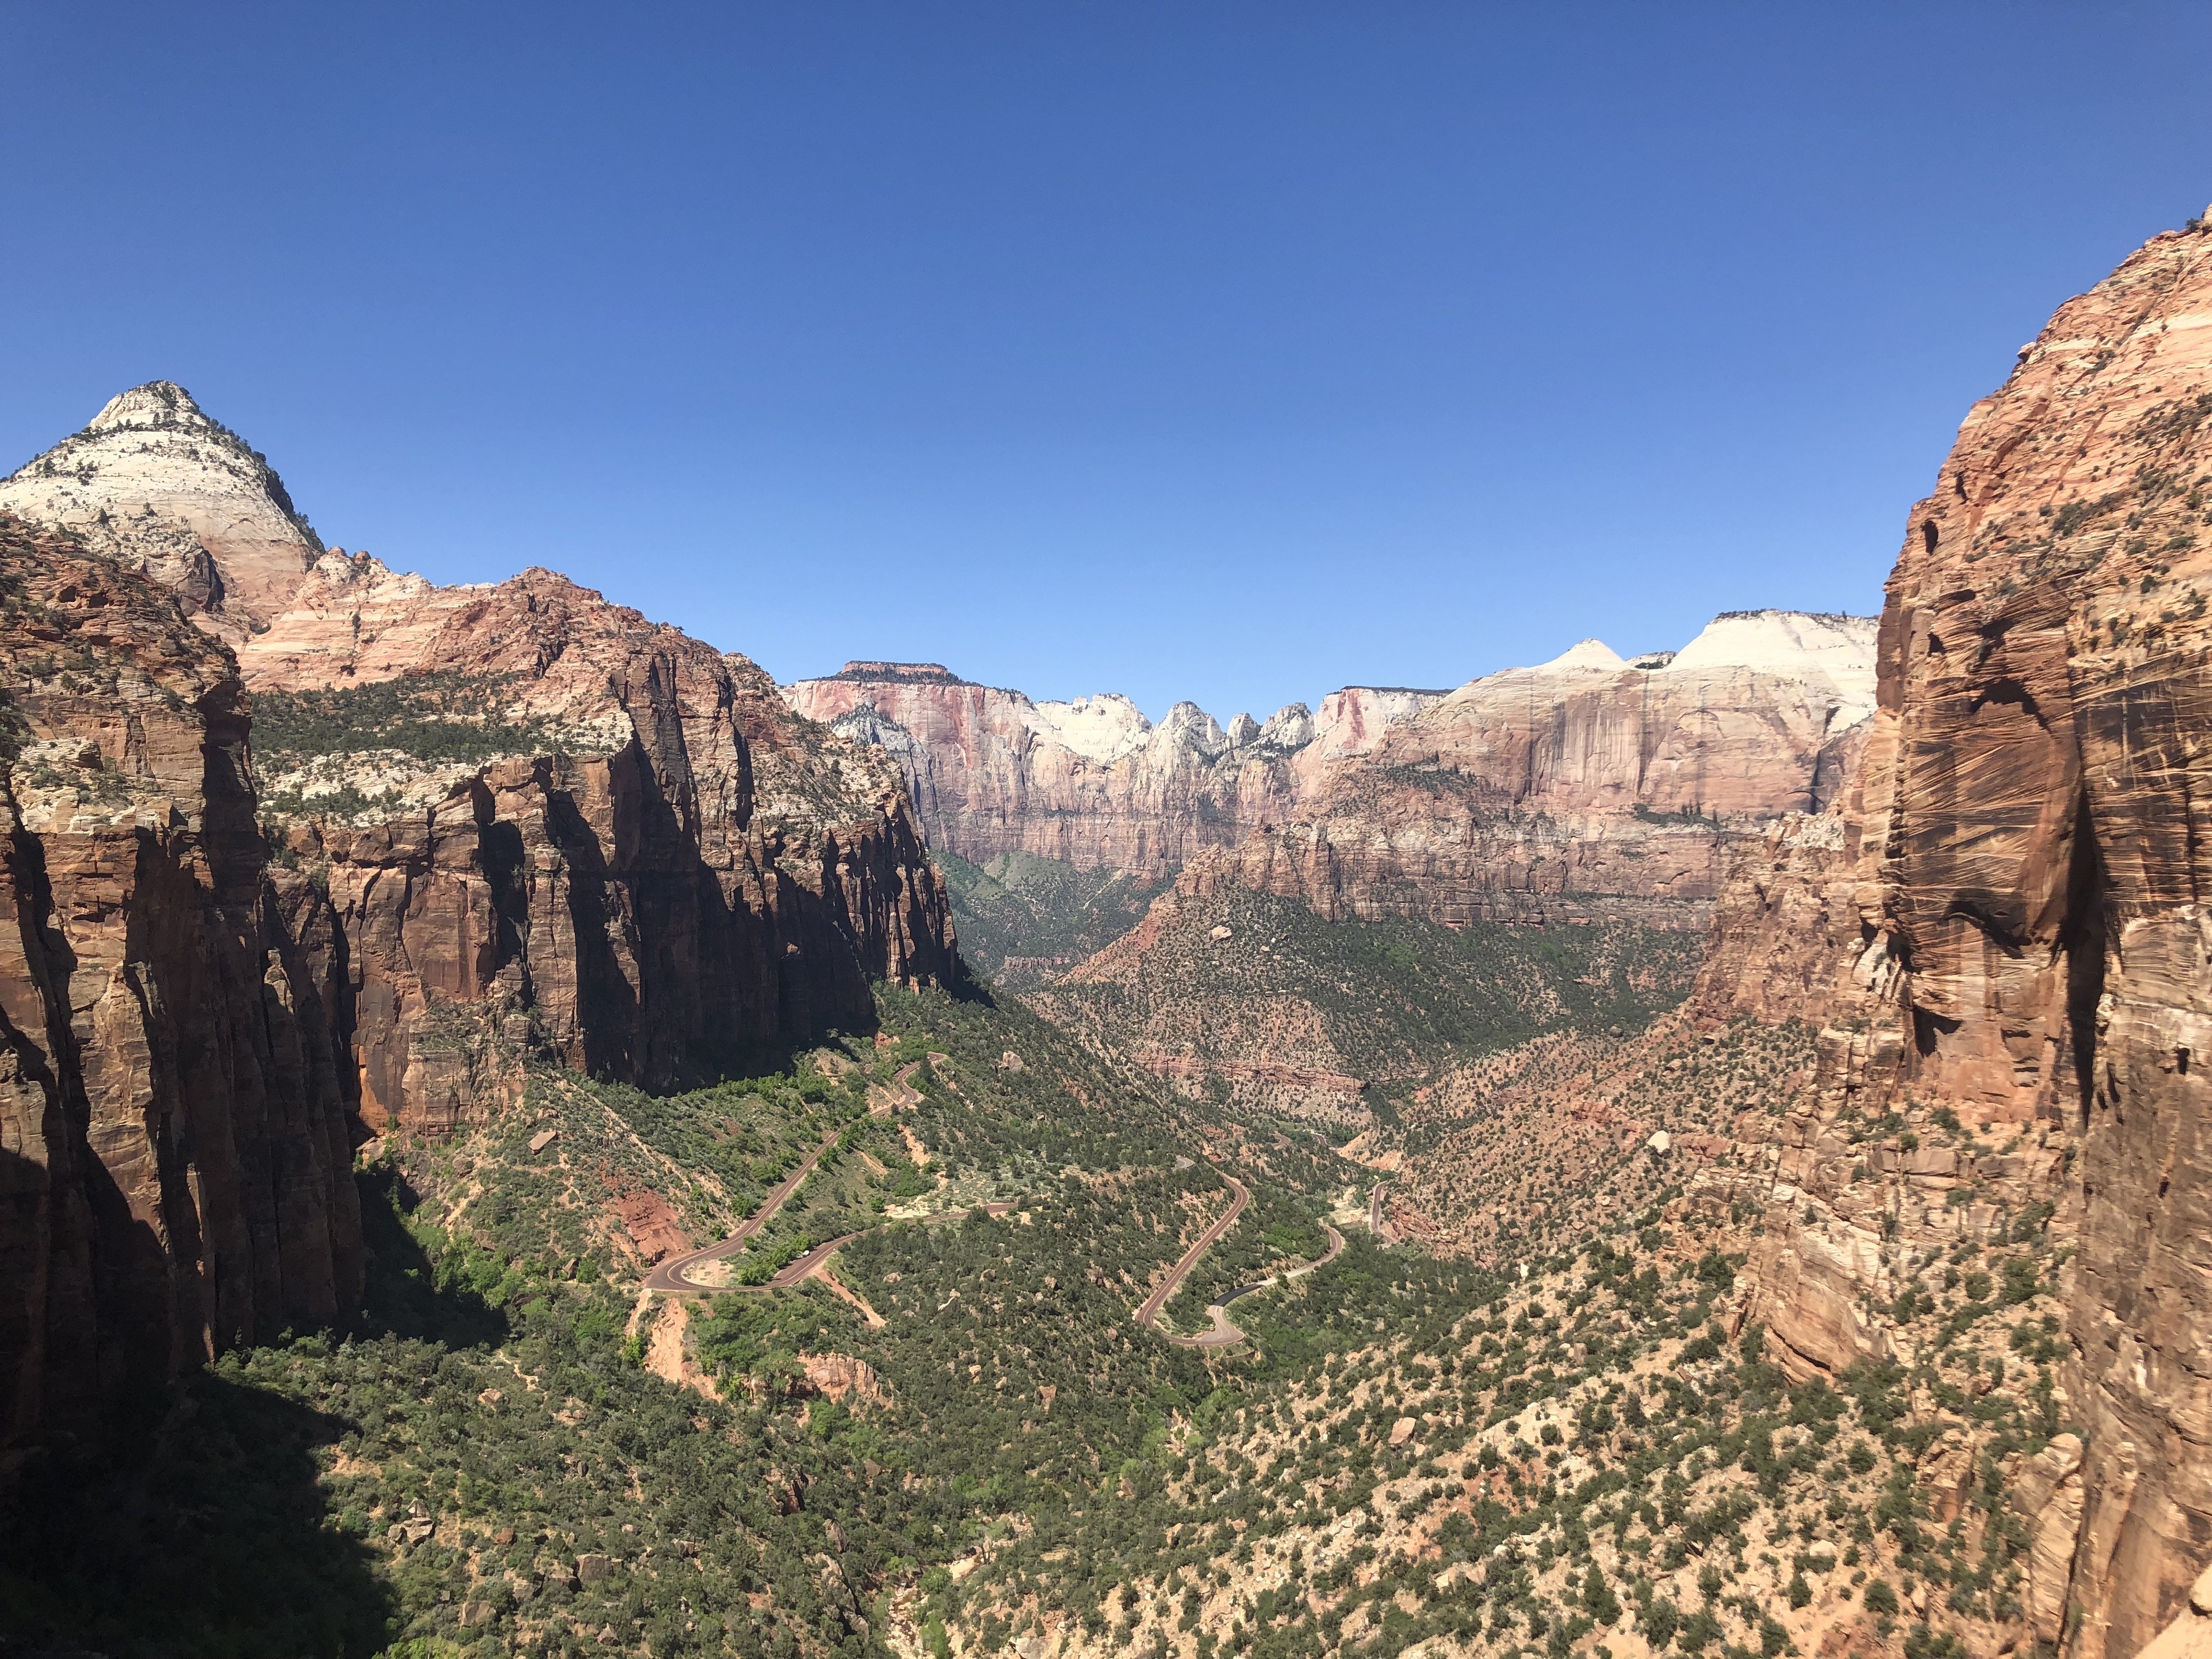
For beginner hikers to experienced moutaineers, the Canyon Overlook is a fun and slightly challenging hike to one of the most gorgeous overlooks in Zion National Park. Because it’s a short trail and not too difficult, this is one of the hikes in Zion I’d recommend to anyone, including beginners and families.
Unlike some of the other short paths in Zion, the Canyon Overlook trail isn’t paved, so you’ll be traversing rocks and gravel for the entire hike. Therefore, if it’s relevant to you, strollers probably aren’t a good idea for this one. However, there aren’t any major uphills and it’s an easy trail, so I’d still recommend it for families.
While the trail is very easy, the rocks can be slippery, so be sure to wear good shoes and watch your step!
Canyon Overlook’s trailhead is located after the tunnel on the East side of the park, so shuttles don’t go there. Instead, drive your car and park near the tunnel.
When you start the trial, you’ll hike up a rock “staircase,” make your way around a ledge on an overhanging trail, stroll under a giant boulder, and finally, make your way out to the stunning viewpoint of the entire east side of the canyon.
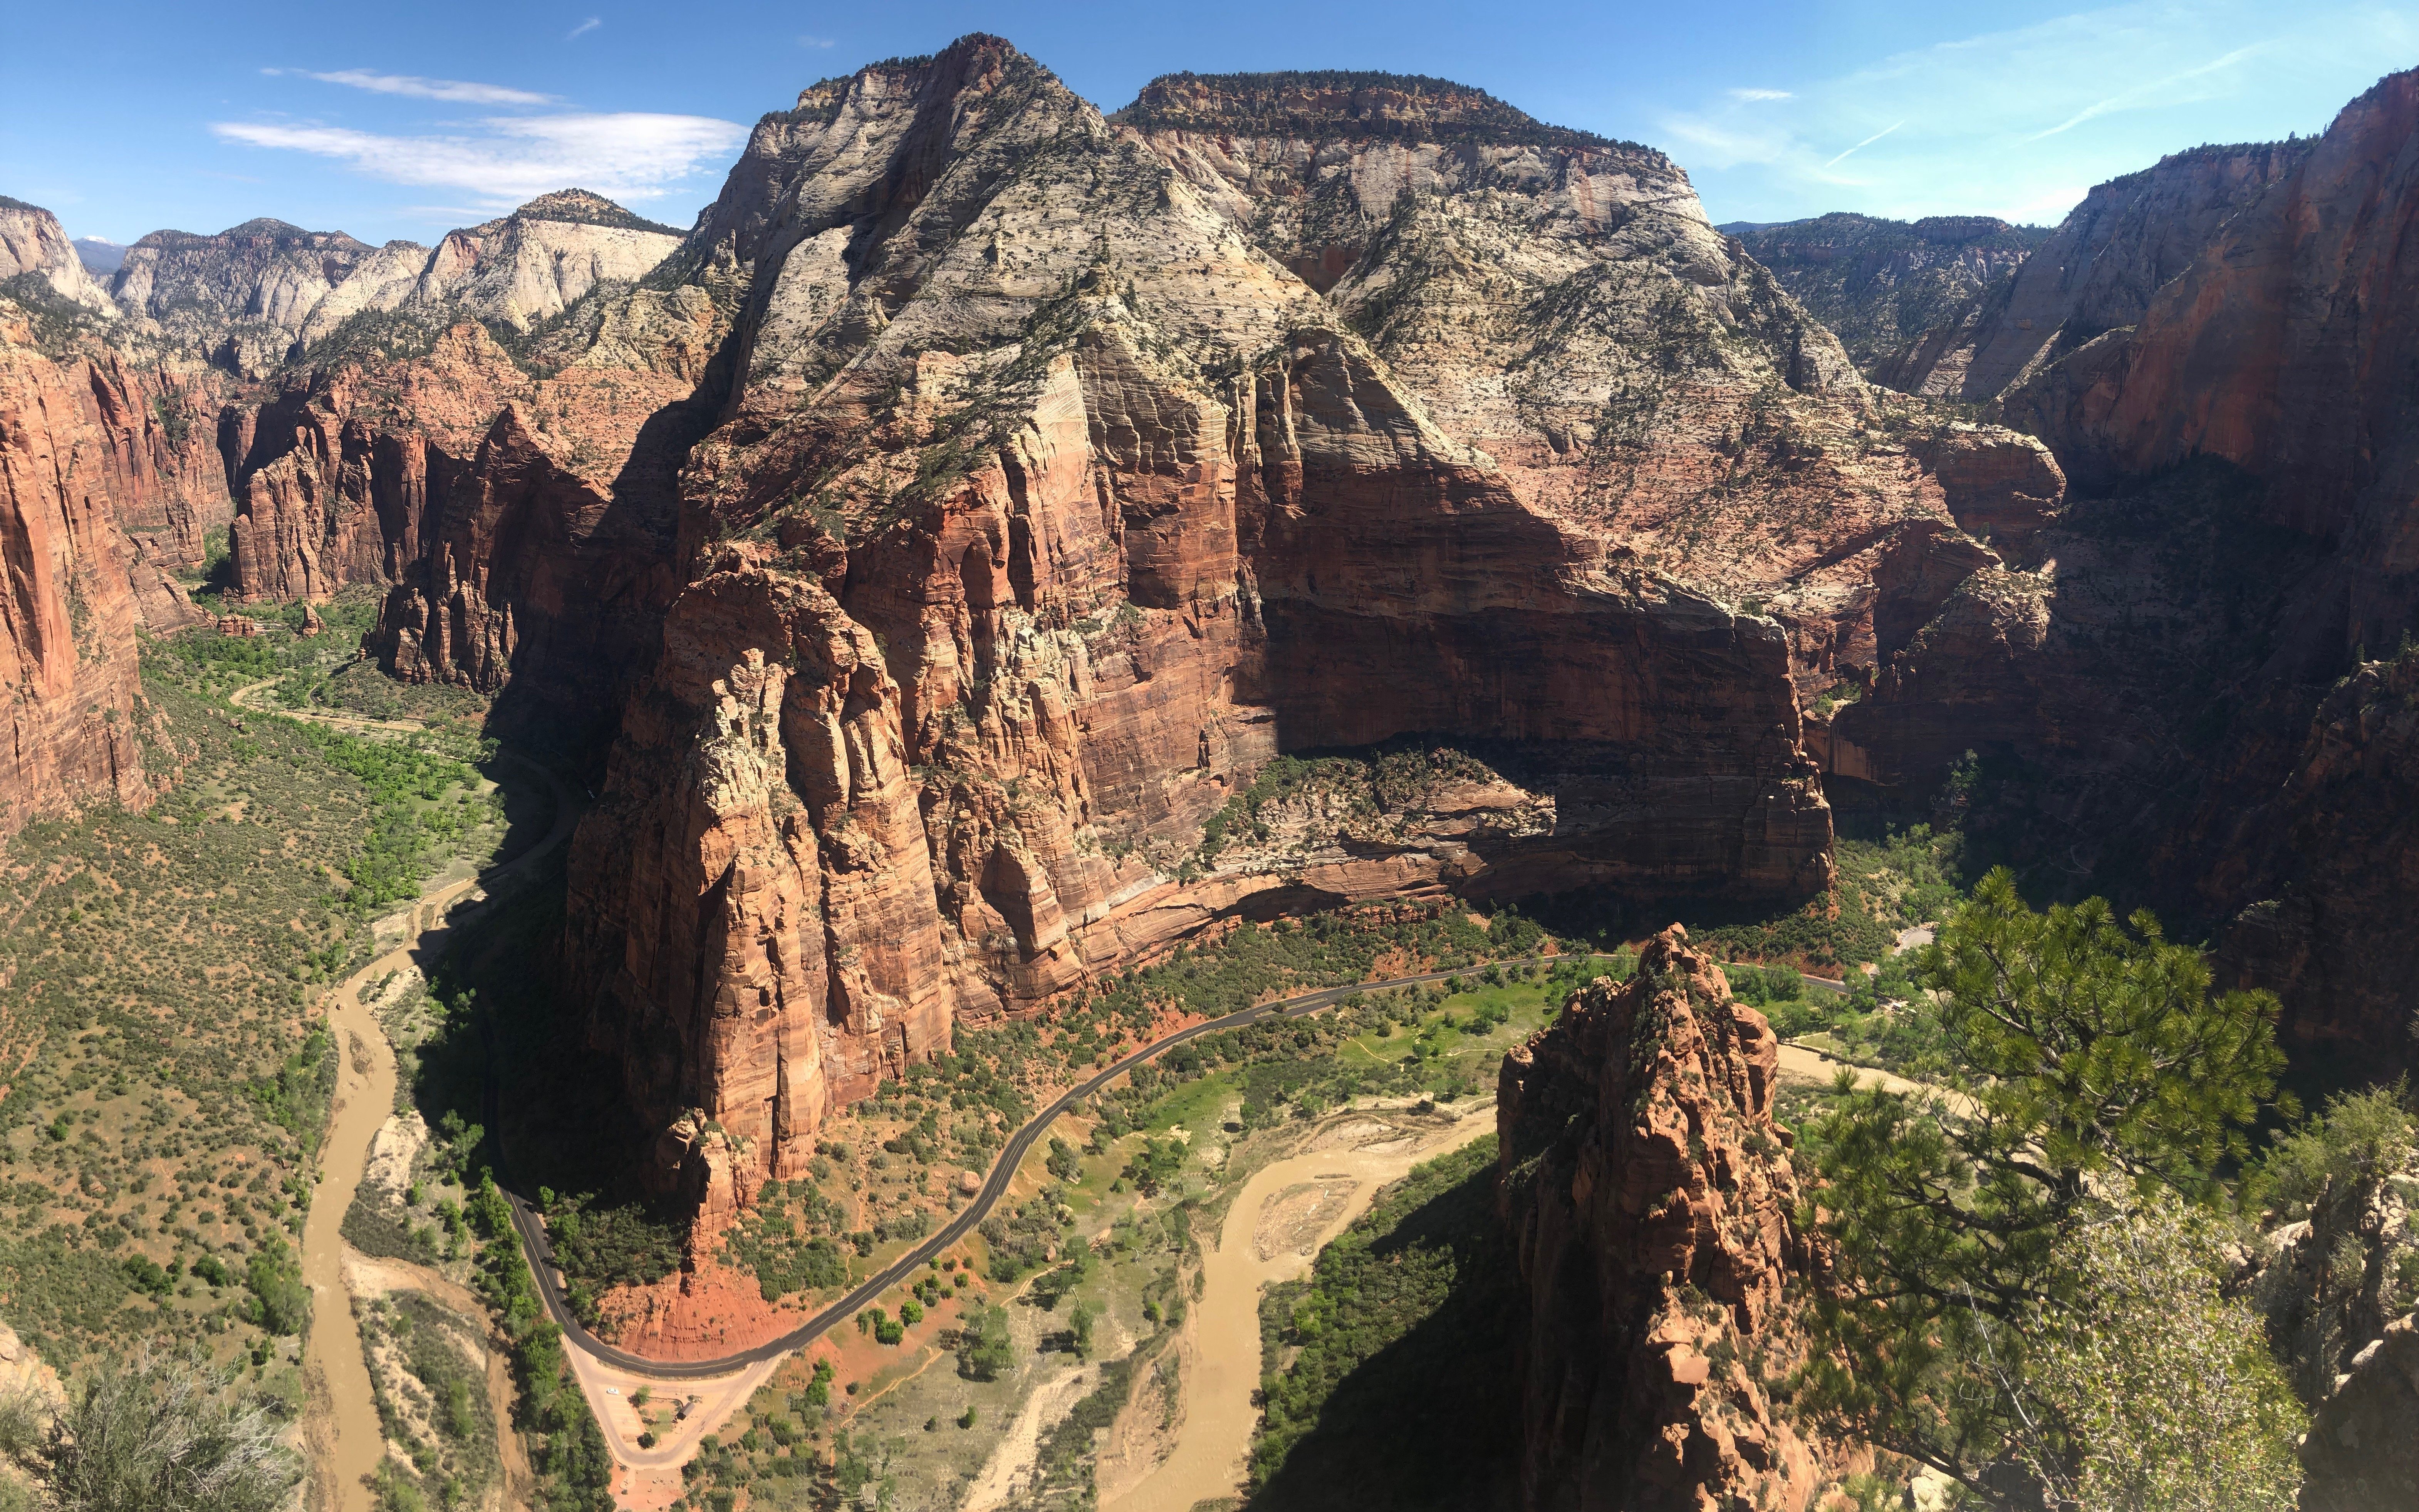
2. Angels Landing: Zion’s Most Adrenaline-Inducing Hike
- Distance: 5.4 miles
- Time Needed: 3 to 6 hours
- Elevation Gain: 1,500 feet
- Difficulty: Hard
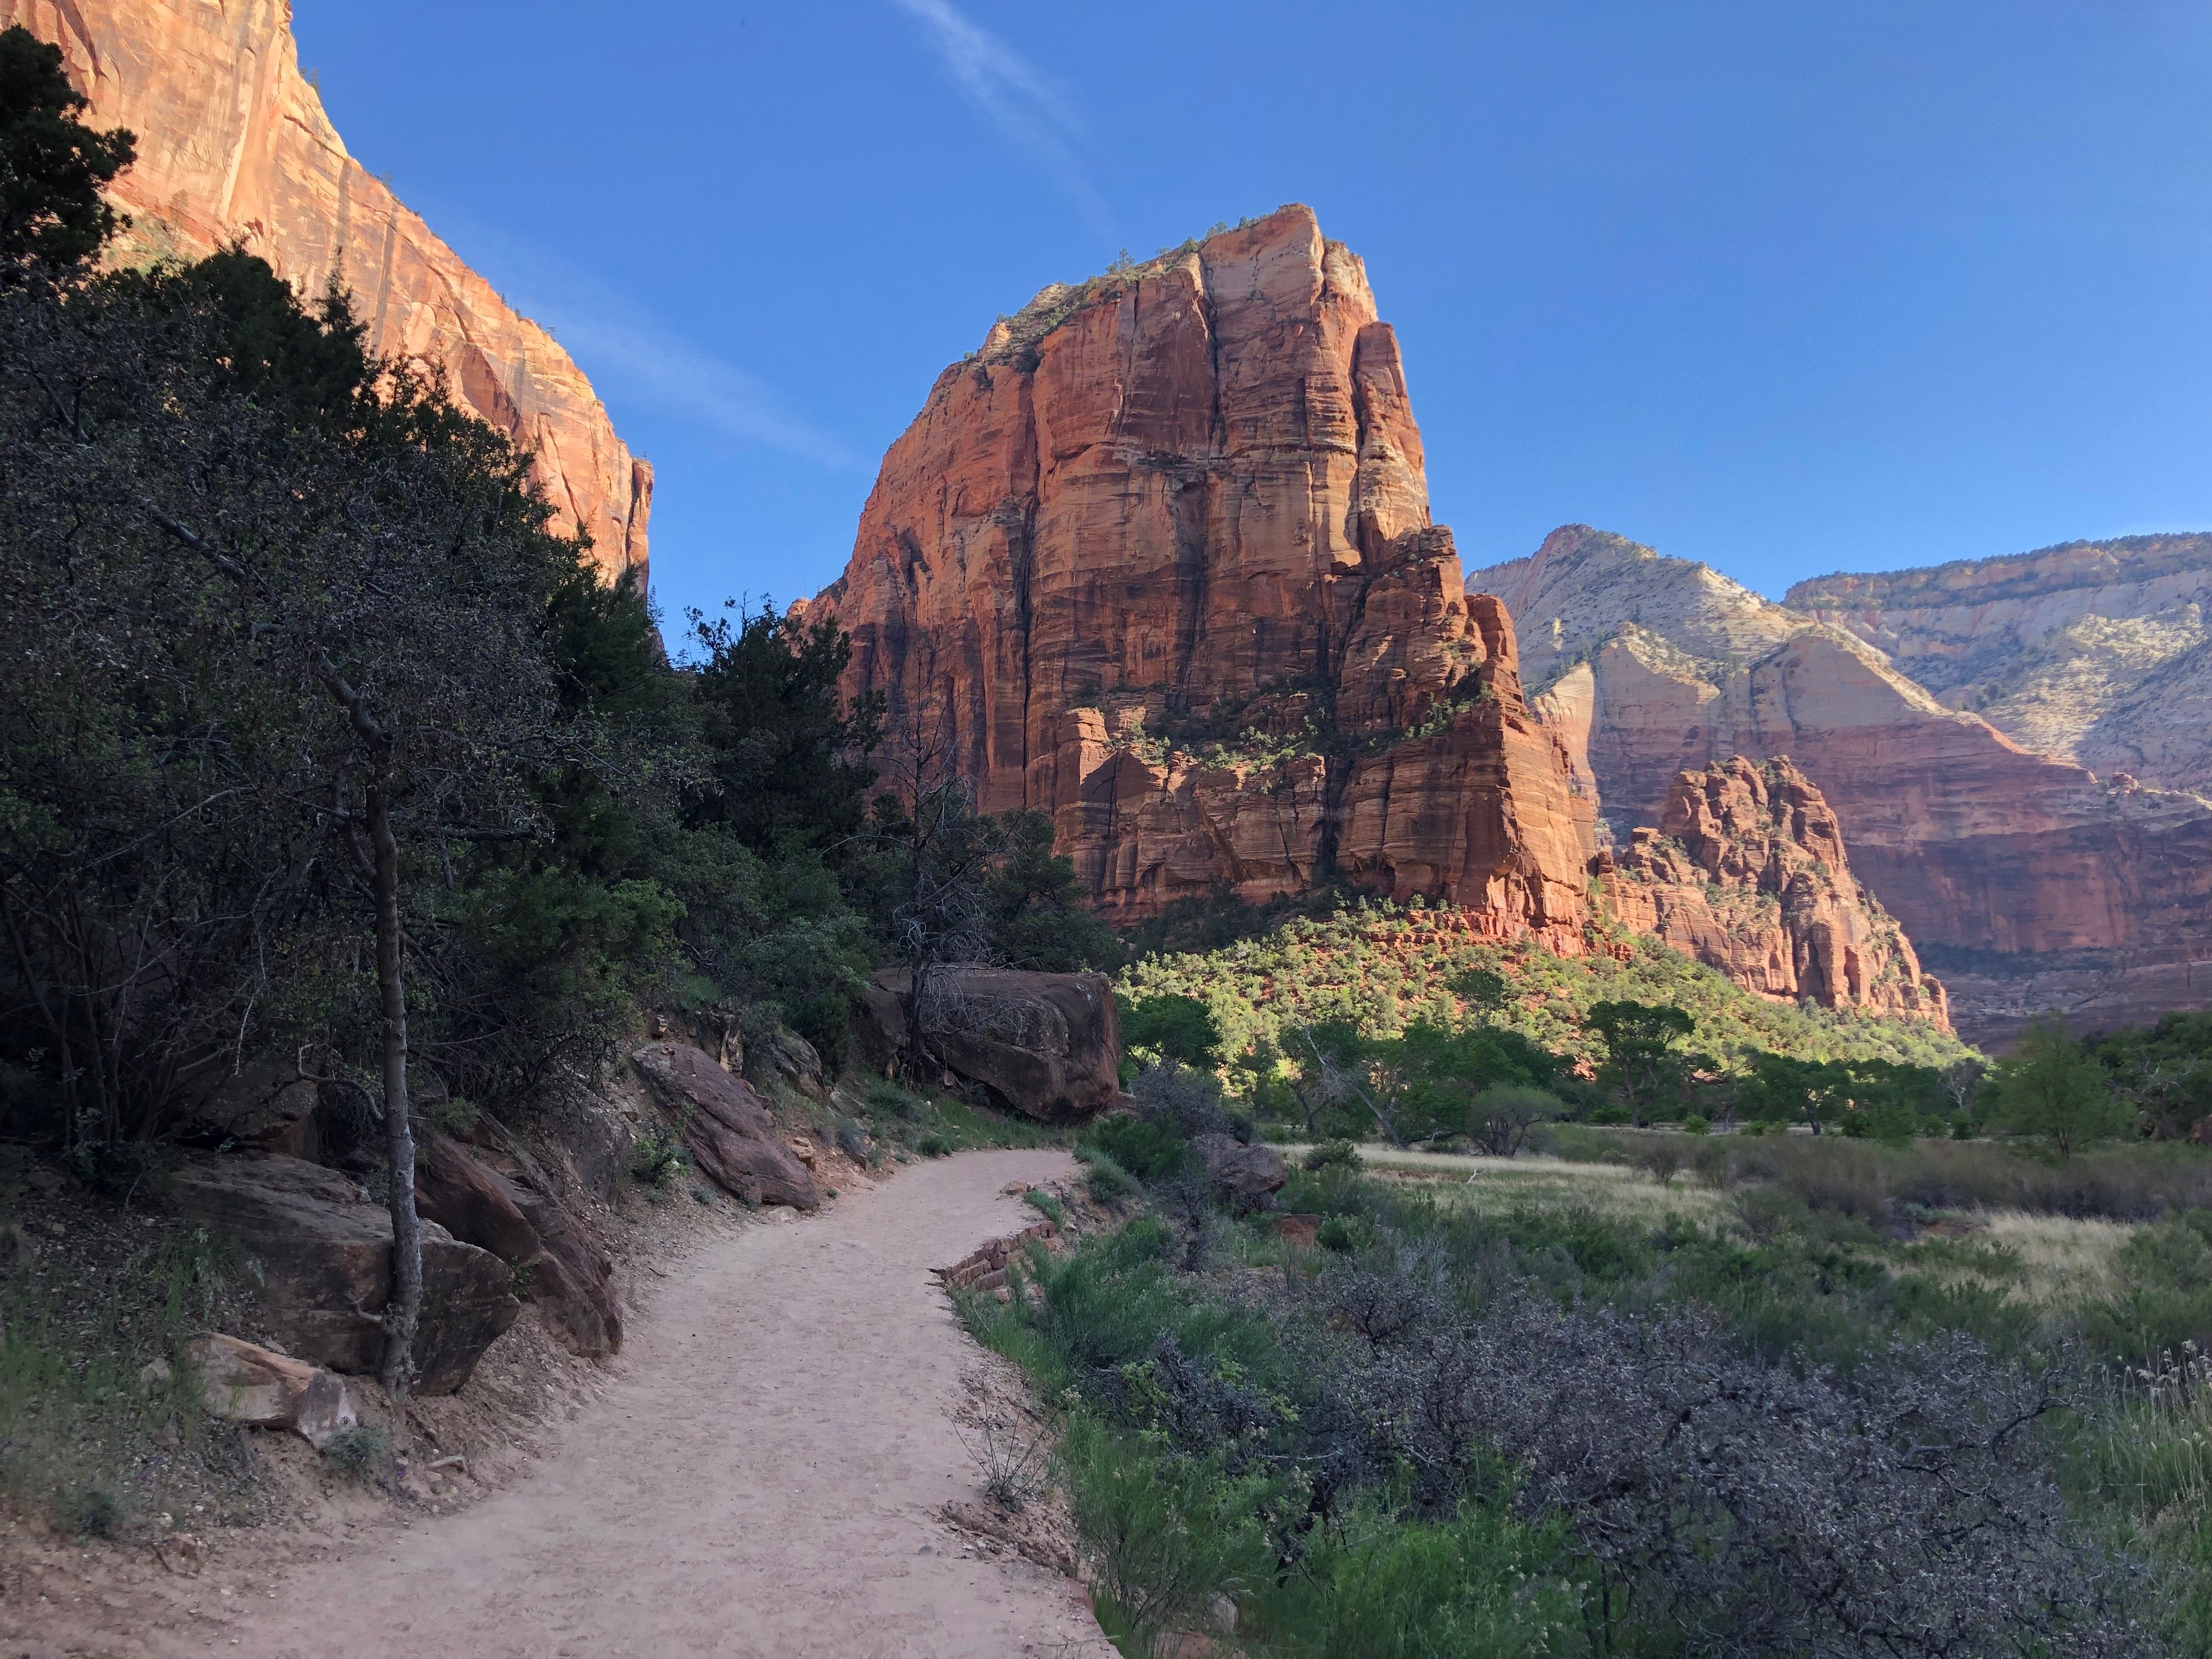
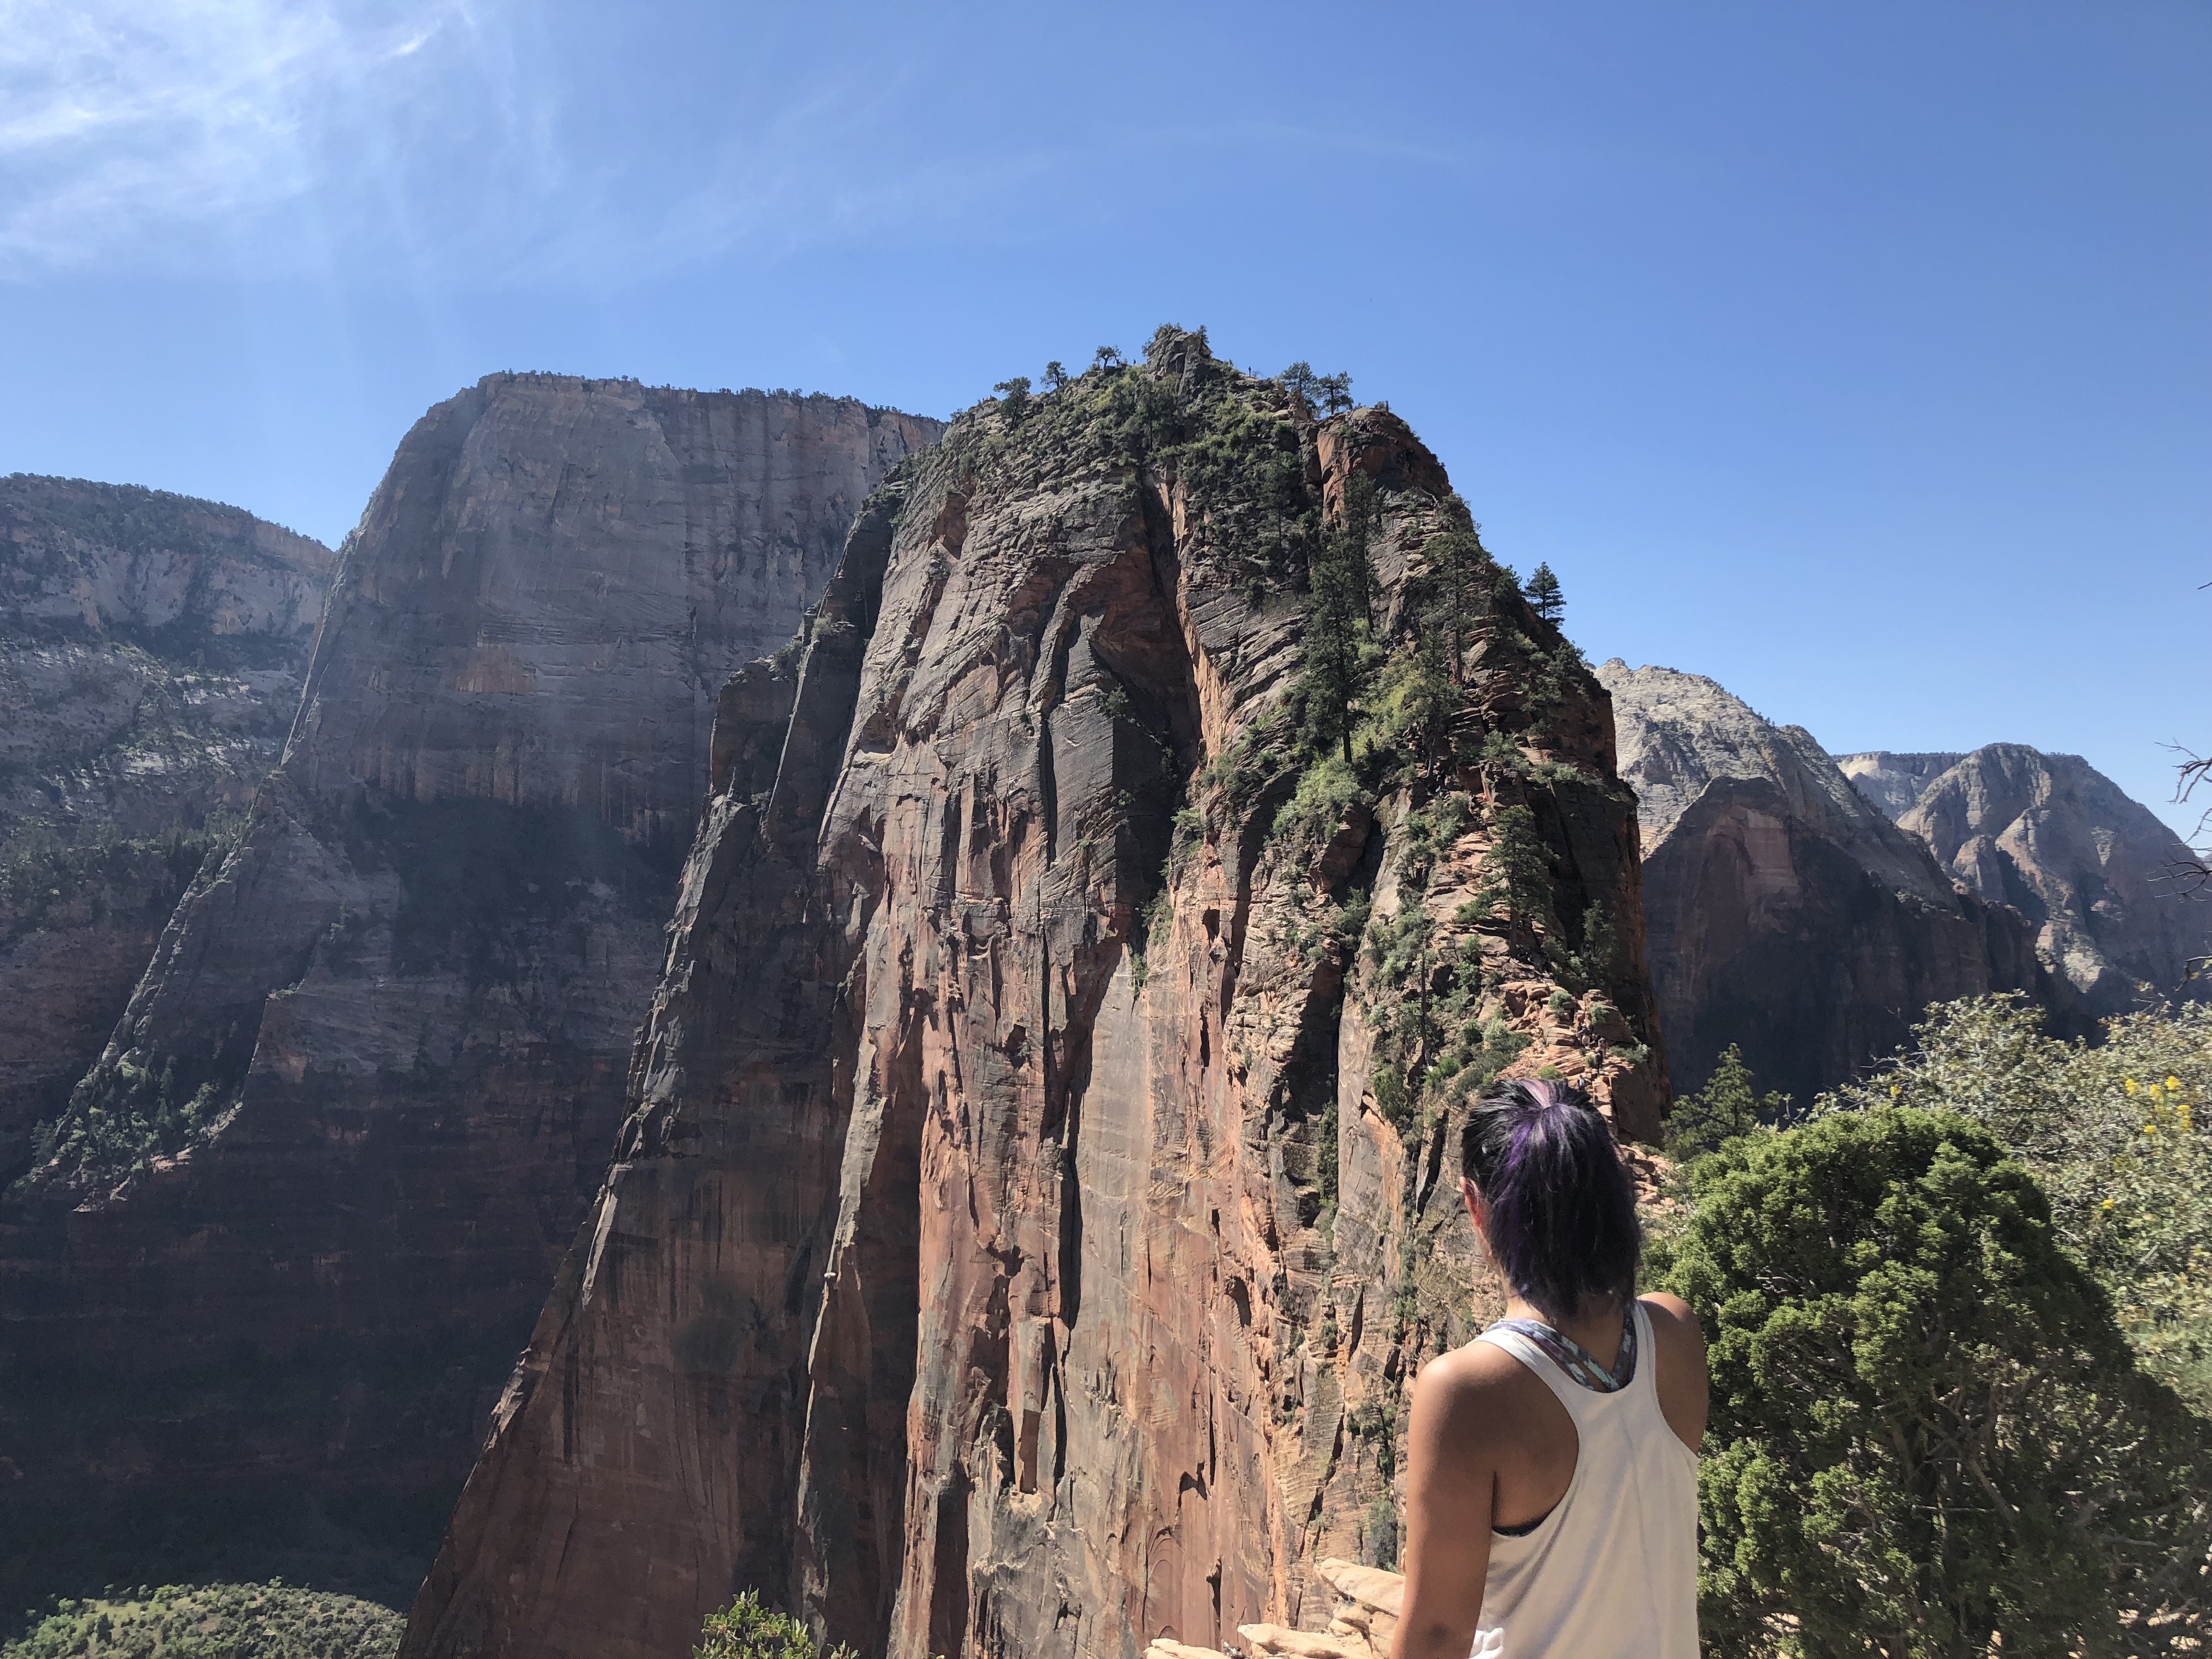
Angels Landing is one of Zion’s most thrilling and popular hikes. Taking you from the bottom of the canyon to the peak of a towering rock formation, Angels Landing isn’t for the faint of heart. If you’re willing to accept the challenges of this thrilling trail, you’ll be rewarded with fun rock scrambling and breathtaking views at the top.
Note: This trail is for experienced hikers only - the trail climbs 1,500 feet in 2.7 miles, including some tough rock scrambling, and is NOT suitable for children or beginners.
It’s best to begin the hike as soon as the park’s shuttle starts running in the morning. The hike begins at the Grotto Canyon shuttle stop (Stop #6), and climbs from the banks of the Virgin River all the way to the peak of Angels Landing.
Along the way, you’ll pass through several sets of switchbacks, a cool, shady slot canyon, and finally, the infamous rock scrambles that have 1,000 foot dropoffs on either side. At the top, you’ll see epic views of both the entrance to Zion Canyon and the Watchman peak, as well as Big Bend and the Narrows.
For more information about the Angels Landing hike, check out our complete guide here:
Click here to read our complete guide to the Angels Landing hike
3. The Narrows: Zion’s Wildest Hike
- Distance: Up to 16 miles
- Time Needed: Up to 8 hours
- Elevation Gain: 334 feet
- Difficulty: Hard
Unfortunately, this trail is usually closed in the spring due to high water levels.
It’s not every day that you can do a hike through a narrow canyon…with a trail that’s completely submerged in water! This is exactly what The Narrows trail offers — a walk inside a calm river through a stunning part of Zion Canyon.
Unfortunately, when I visited Zion, the Narrows Trail was closed the entire time due to snow melt and high waters (over 9x the normal height!). According to park rangers, this happens sometimes throughout the year, so you’ll need to check in with them (or look on their website) to check whether the trail is open and get up-to-date condition reports.
There are two starting points for the Narrows Trail: the north end and the south end. I walked up to the entrance on the South End (which coincides with the Riverside Trail), but couldn’t go any farther.
In total, the Narrows Hike is 16 miles long, but most people simply hike as far as they’d like and then return to their starting point.
4. Watchman Trail: Zion’s Most Epic Sunset Hike
- Distance: 3.3 miles
- Time Needed: 1.5 to 2 hours
- Elevation Gain: 368 feet
- Difficulty: Moderate
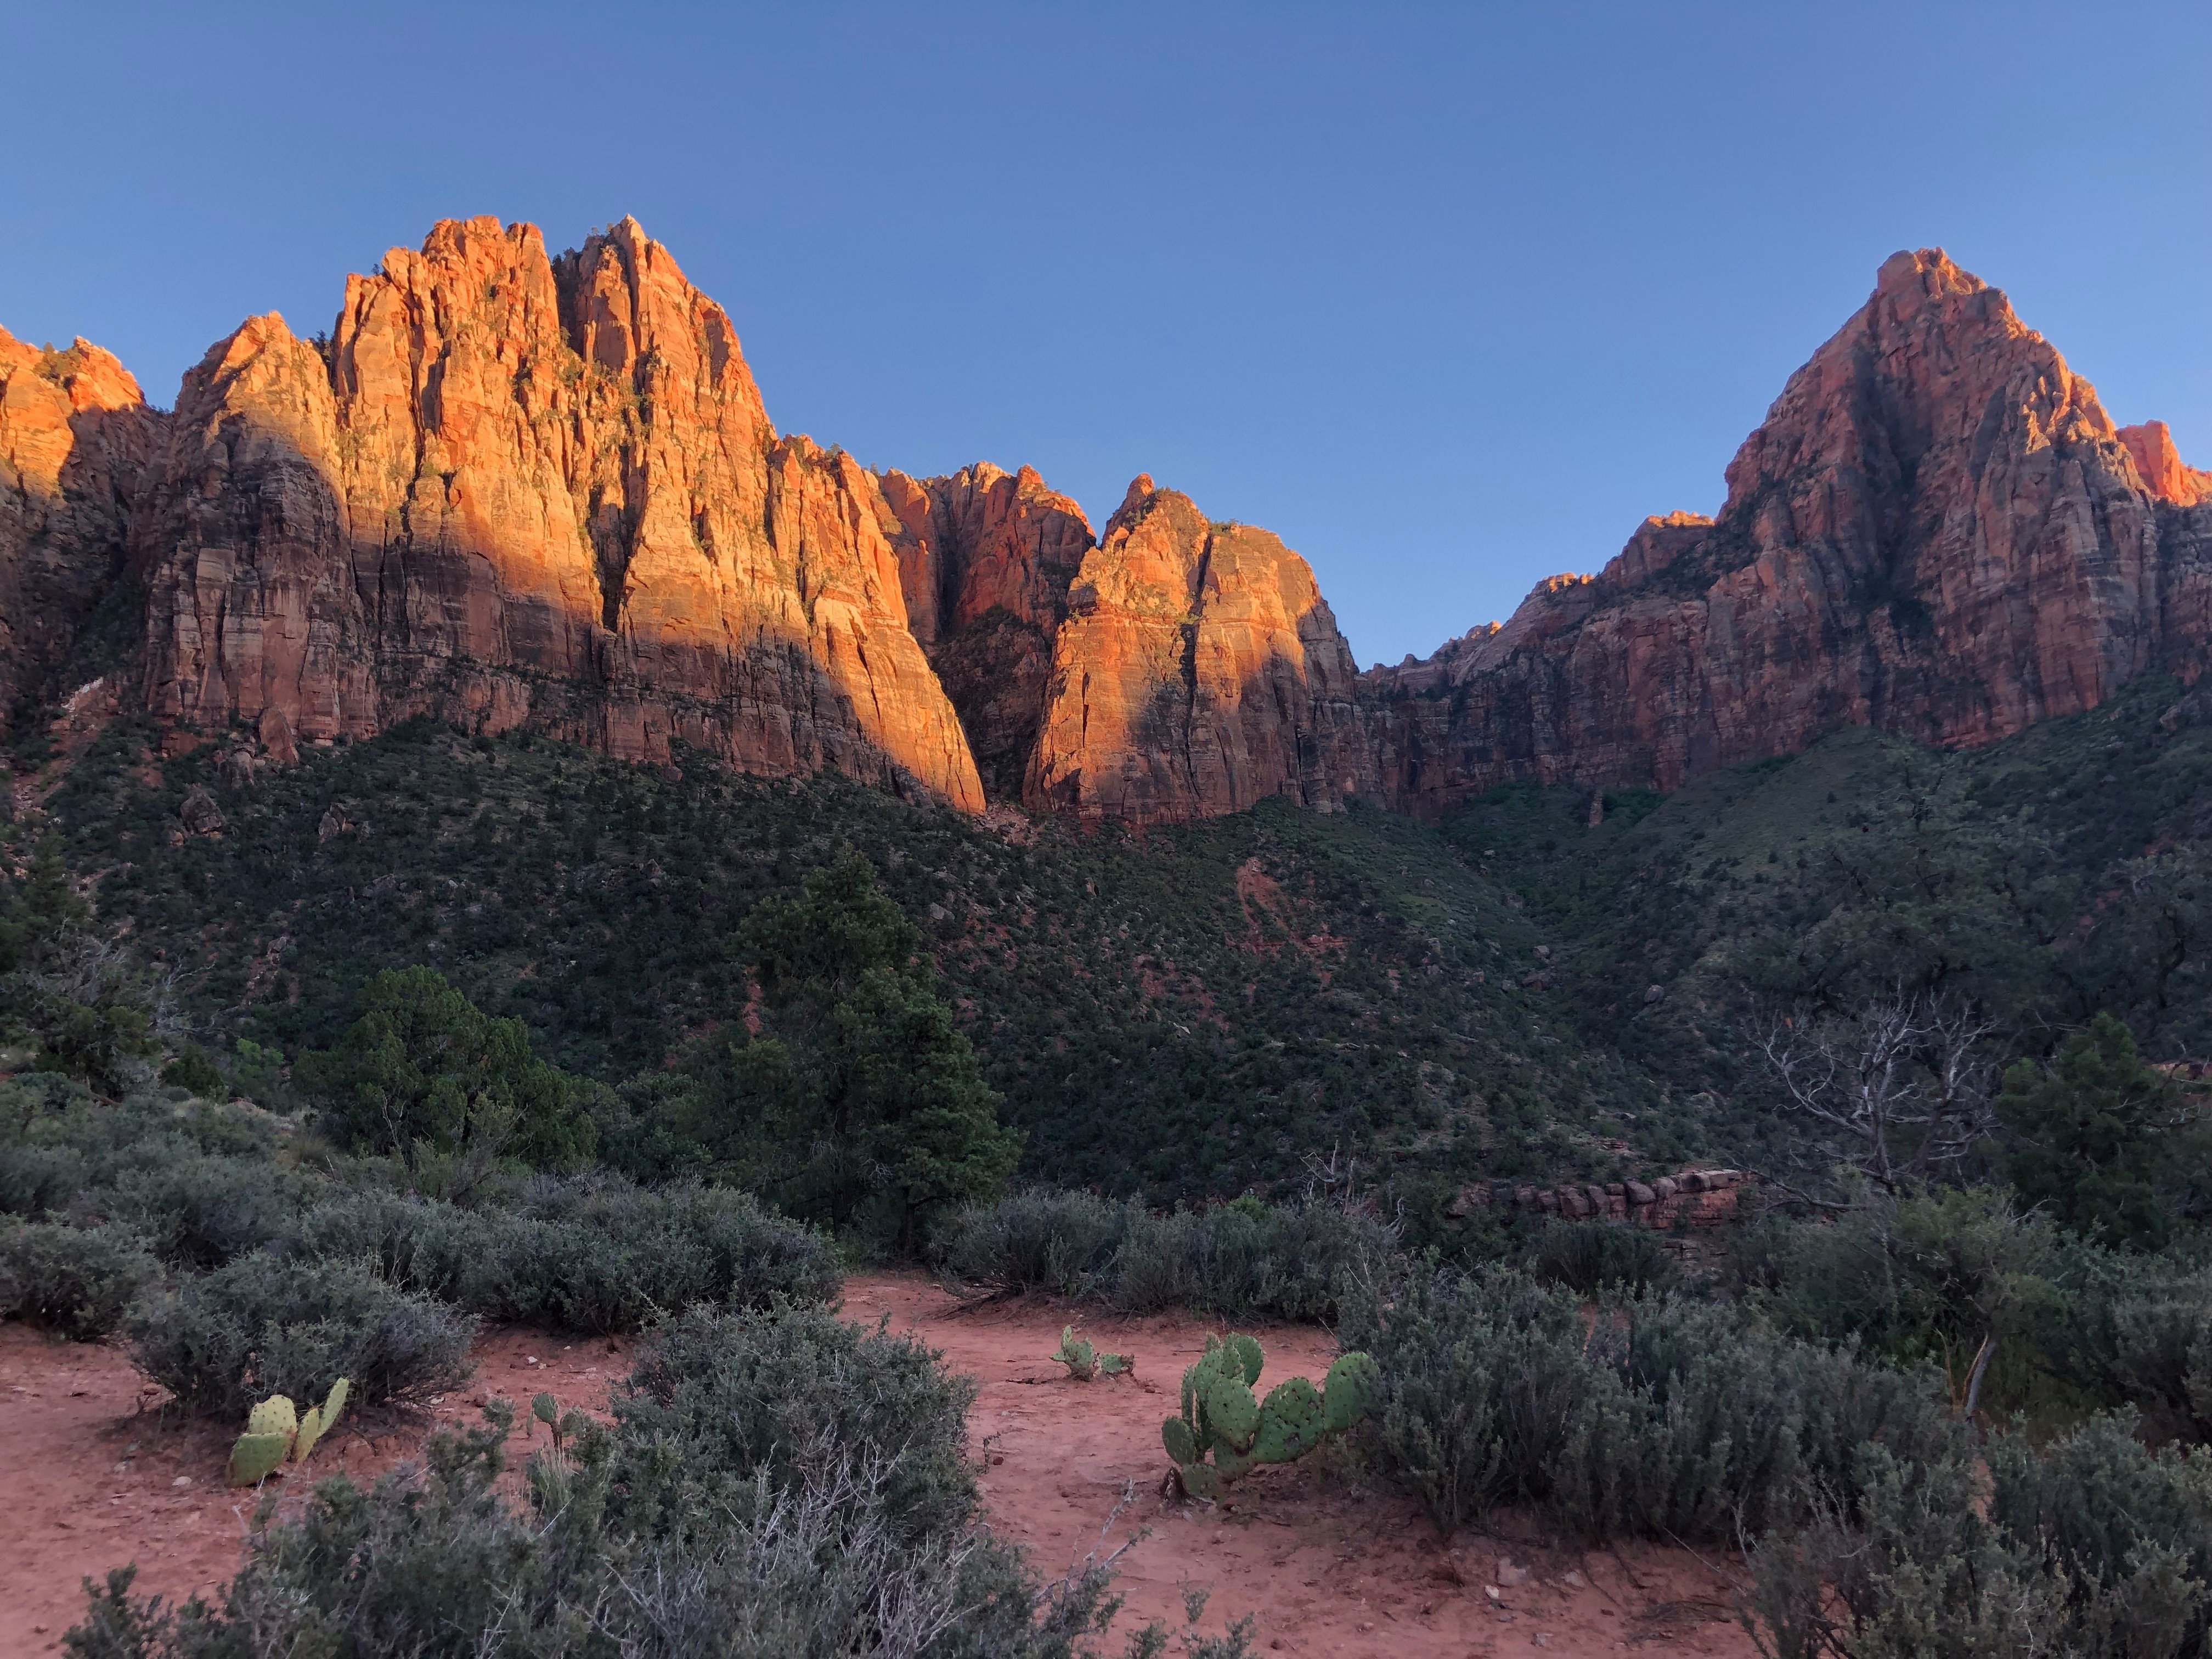
If you’re looking for a wonderful place to watch the sunset in Zion, there’s really no better choice than the Watchman Trail. From this viewpoint, you can catch the sun sparkling against the Watchman peak, as well as the other ridges surrounding the overlook. Although the trail rated as moderate, it’s one of the hikes in Zion that’s suitable for beginners and families, with no overly difficult or technical areas.
The hike begins at the Visitor’s Center, which means you won’t need to take a shuttle there. Simply follow the signs to the Watchman and Pa’Rus trail, then when you cross the road, stay on the right side of the river for the Watchman Trail.

When you begin ascending, you’ll enter an area with lots of boulders and plant life. Although it is uphill, the slope is gradual and not too difficult. Eventually, you will reach the overlook point, which has stunning views of the valley and the nearby rocky peaks. Hang out here until the sun begins to turn orange and you’ll be in for a real spectacle!
Easy Hikes in Zion National Park
5. Pa’rus Trail
- Distance: 3.5 miles
- Time Needed: 1.5 to 2 hours
- Elevation Gain: 50 feet
If you’re short on time or just want a simple, easy path through the Zion Canyon, the Pa’rus Trail is a fabulous option.
Because it’s so close to the entrance, it makes for a fantastic end-of-day hike, and boasts some of the most spectacular sunset views in the entire park. In Paiute, a Native American language, “Pa’rus” means “bubbling water,” which refers to the trail’s close proximity to the Virgin River.
As one of the most accessible hikes in Zion National Park, the Pa’rus Trail is perfect for stretching your legs or getting some steps in as a beginner hiker.
Extending from the Visitor’s Center to the Canyon Junction, the Pa’rus trail is a paved pathway that follows the river up the canyon for a few miles. Here, you can see the Watchman tower and catch sparkling sunset rock views along the ridge. There are also lots of footbridges you can pass over to catch even more spectacular views.
6. Archaeology Trail
- Distance: 0.4 miles
- Time Needed: Less than 30 minutes
- Elevation Gain: 80 feet
This short hike is for the history and archaeology aficionados out there! The trail, located next to the Visitor’s Center, takes you to an old Pueblo building, where you can still see the ruins of the old structure. There are also placards along the way explaining the history of the area.
If you’re interested in learning more about some of the items recovered from archaeology efforts in Zion, head to the Zion Human History Museum, which is Stop #2 on the shuttle, or a short walk from the Visitor’s Center.
7. The Grotto Trail
- Distance: 1 mile
- Time Needed: Less than 30 minutes
- Elevation Gain: 35 feet
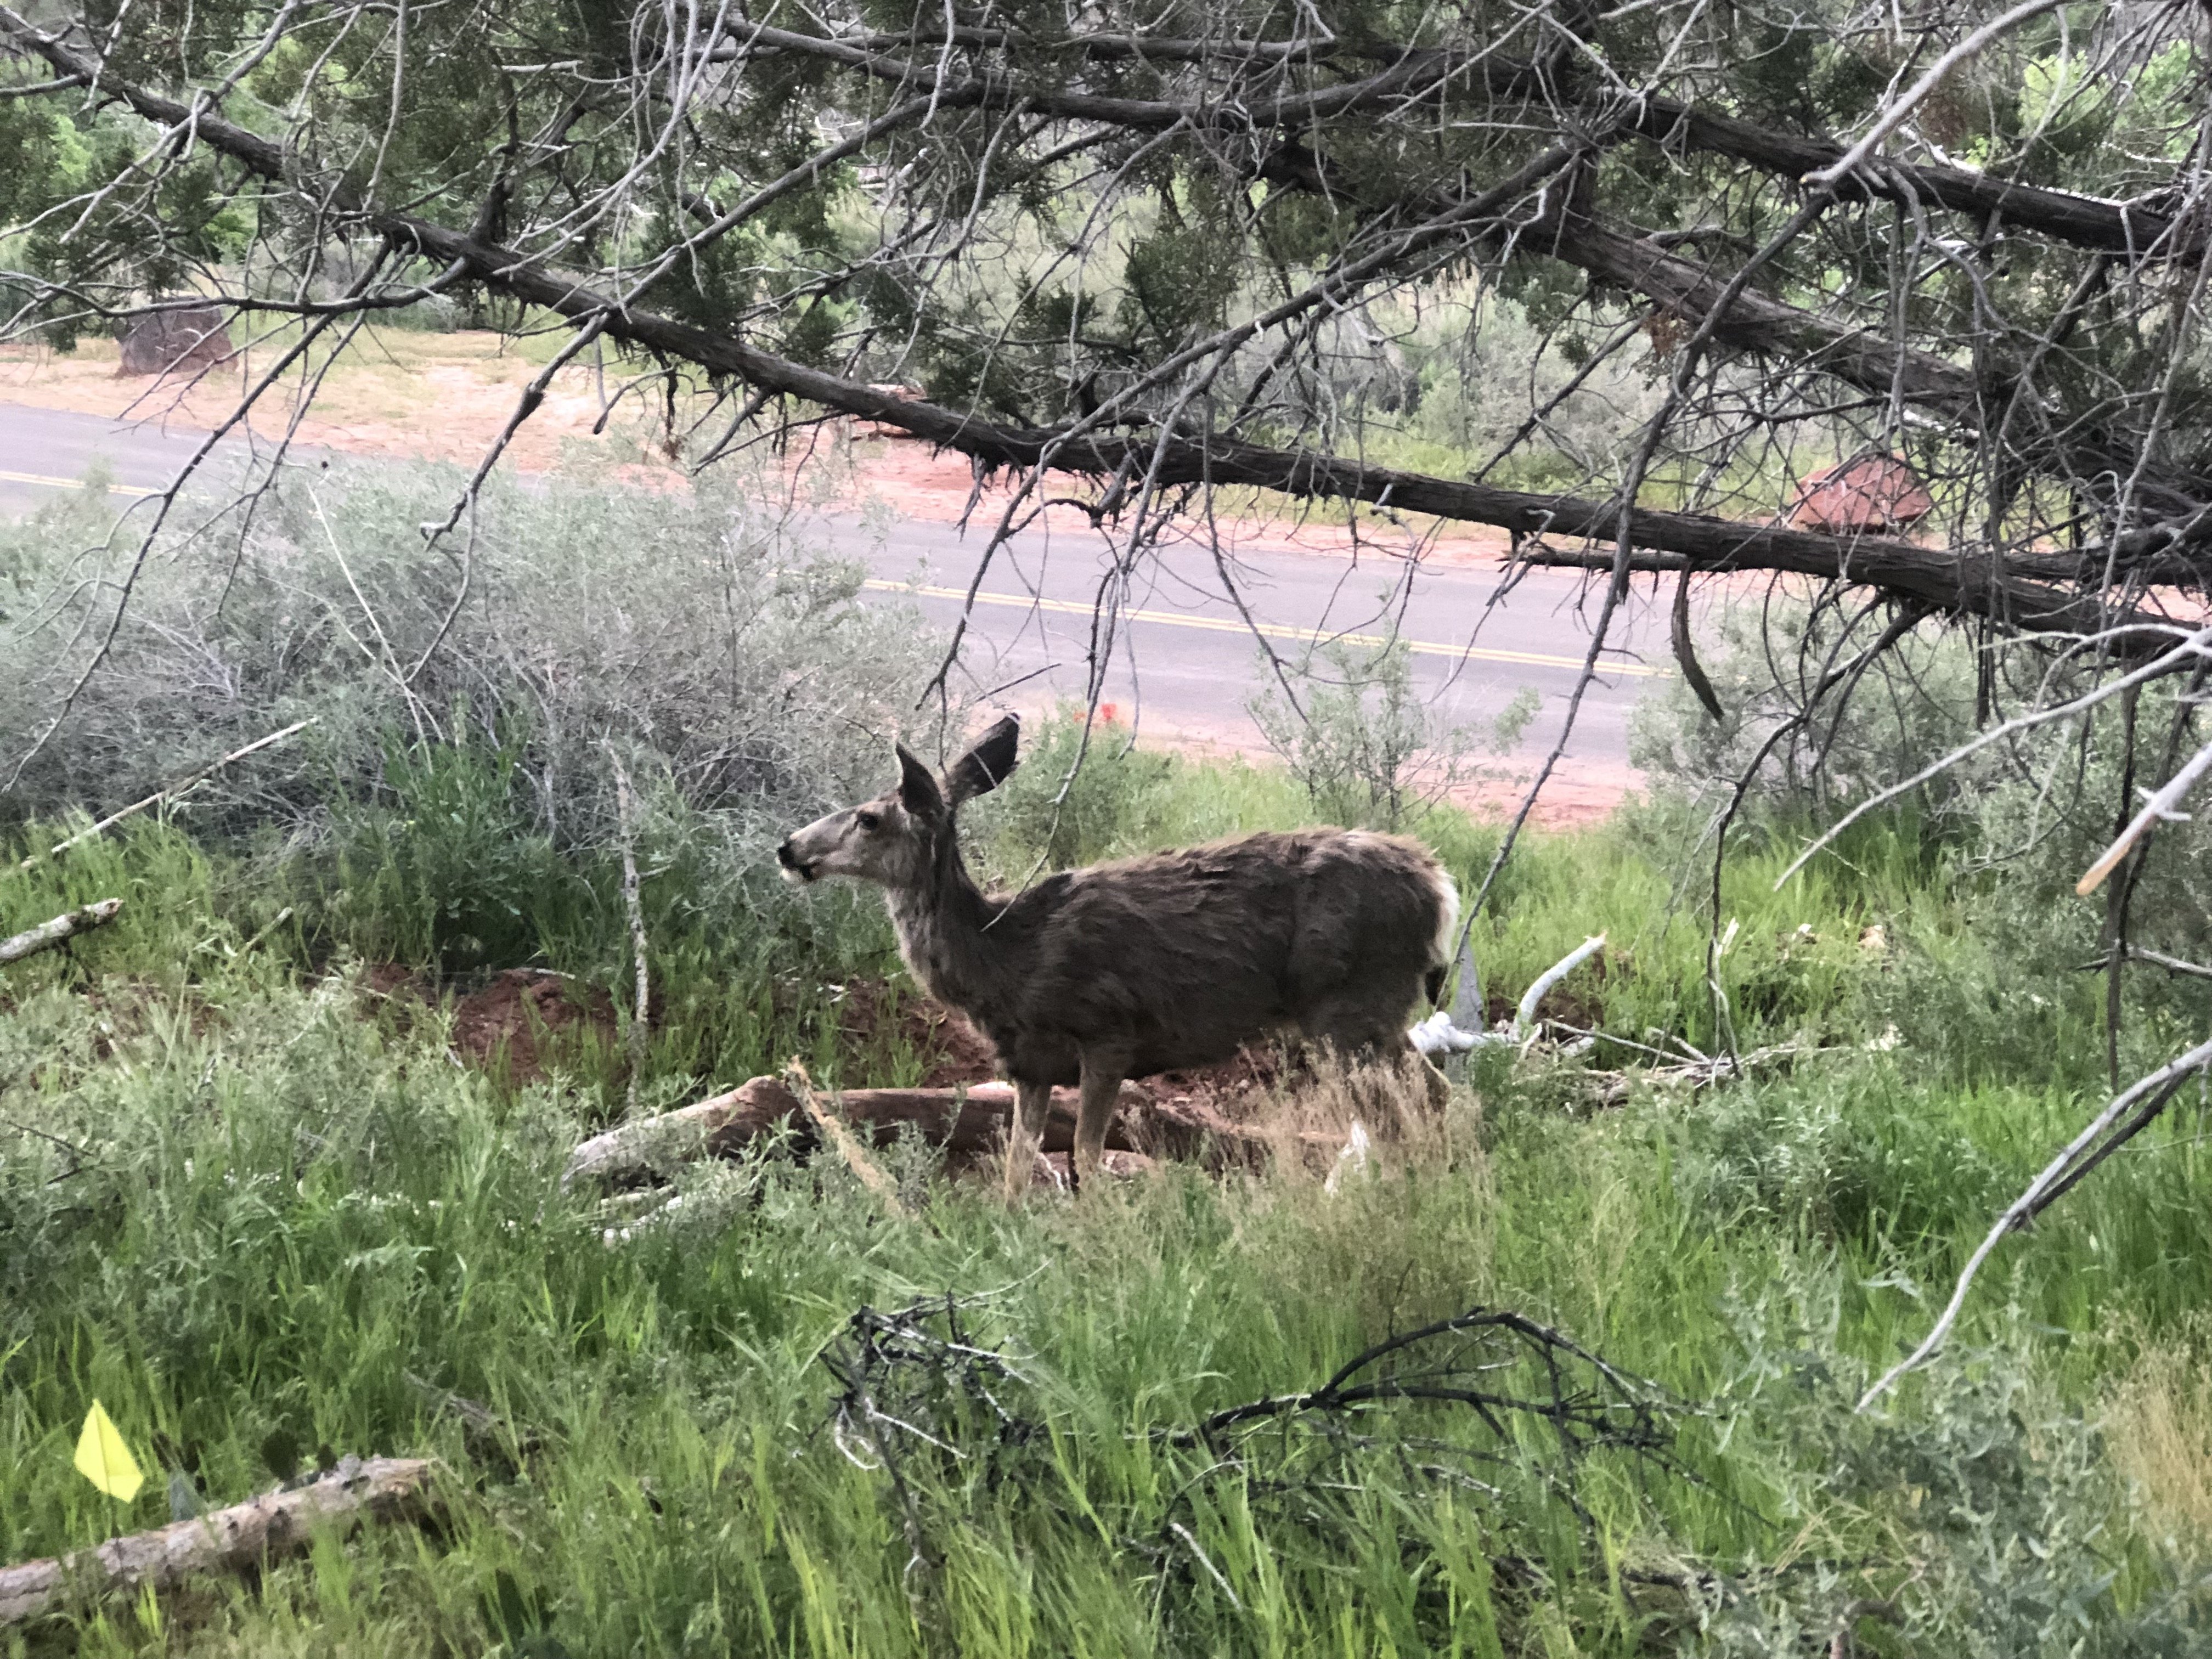
The Grotto Trail is a short hike that runs parallel to the shuttle road in Zion, but we’ve included it here for two reasons: because it’s an easy, family-friendly hike that’s great if you’re on a time crunch, and because it’s supposed to be one of the best hikes in Zion to see wildlife.
Getting here is easy - just get off at The Grotto (Stop #6) and walk to the Zion Lodge (Stop #5), or vice versa. The pathway meanders along the roadside bordering a large, grassy area where you can see wildlife.
While we only really saw some tiny lizards and a chipmunk or two, apparently you can also see deer and sheep, too. Tackle this trail later in the day or early in the morning for the best chances of seeing wildlife.
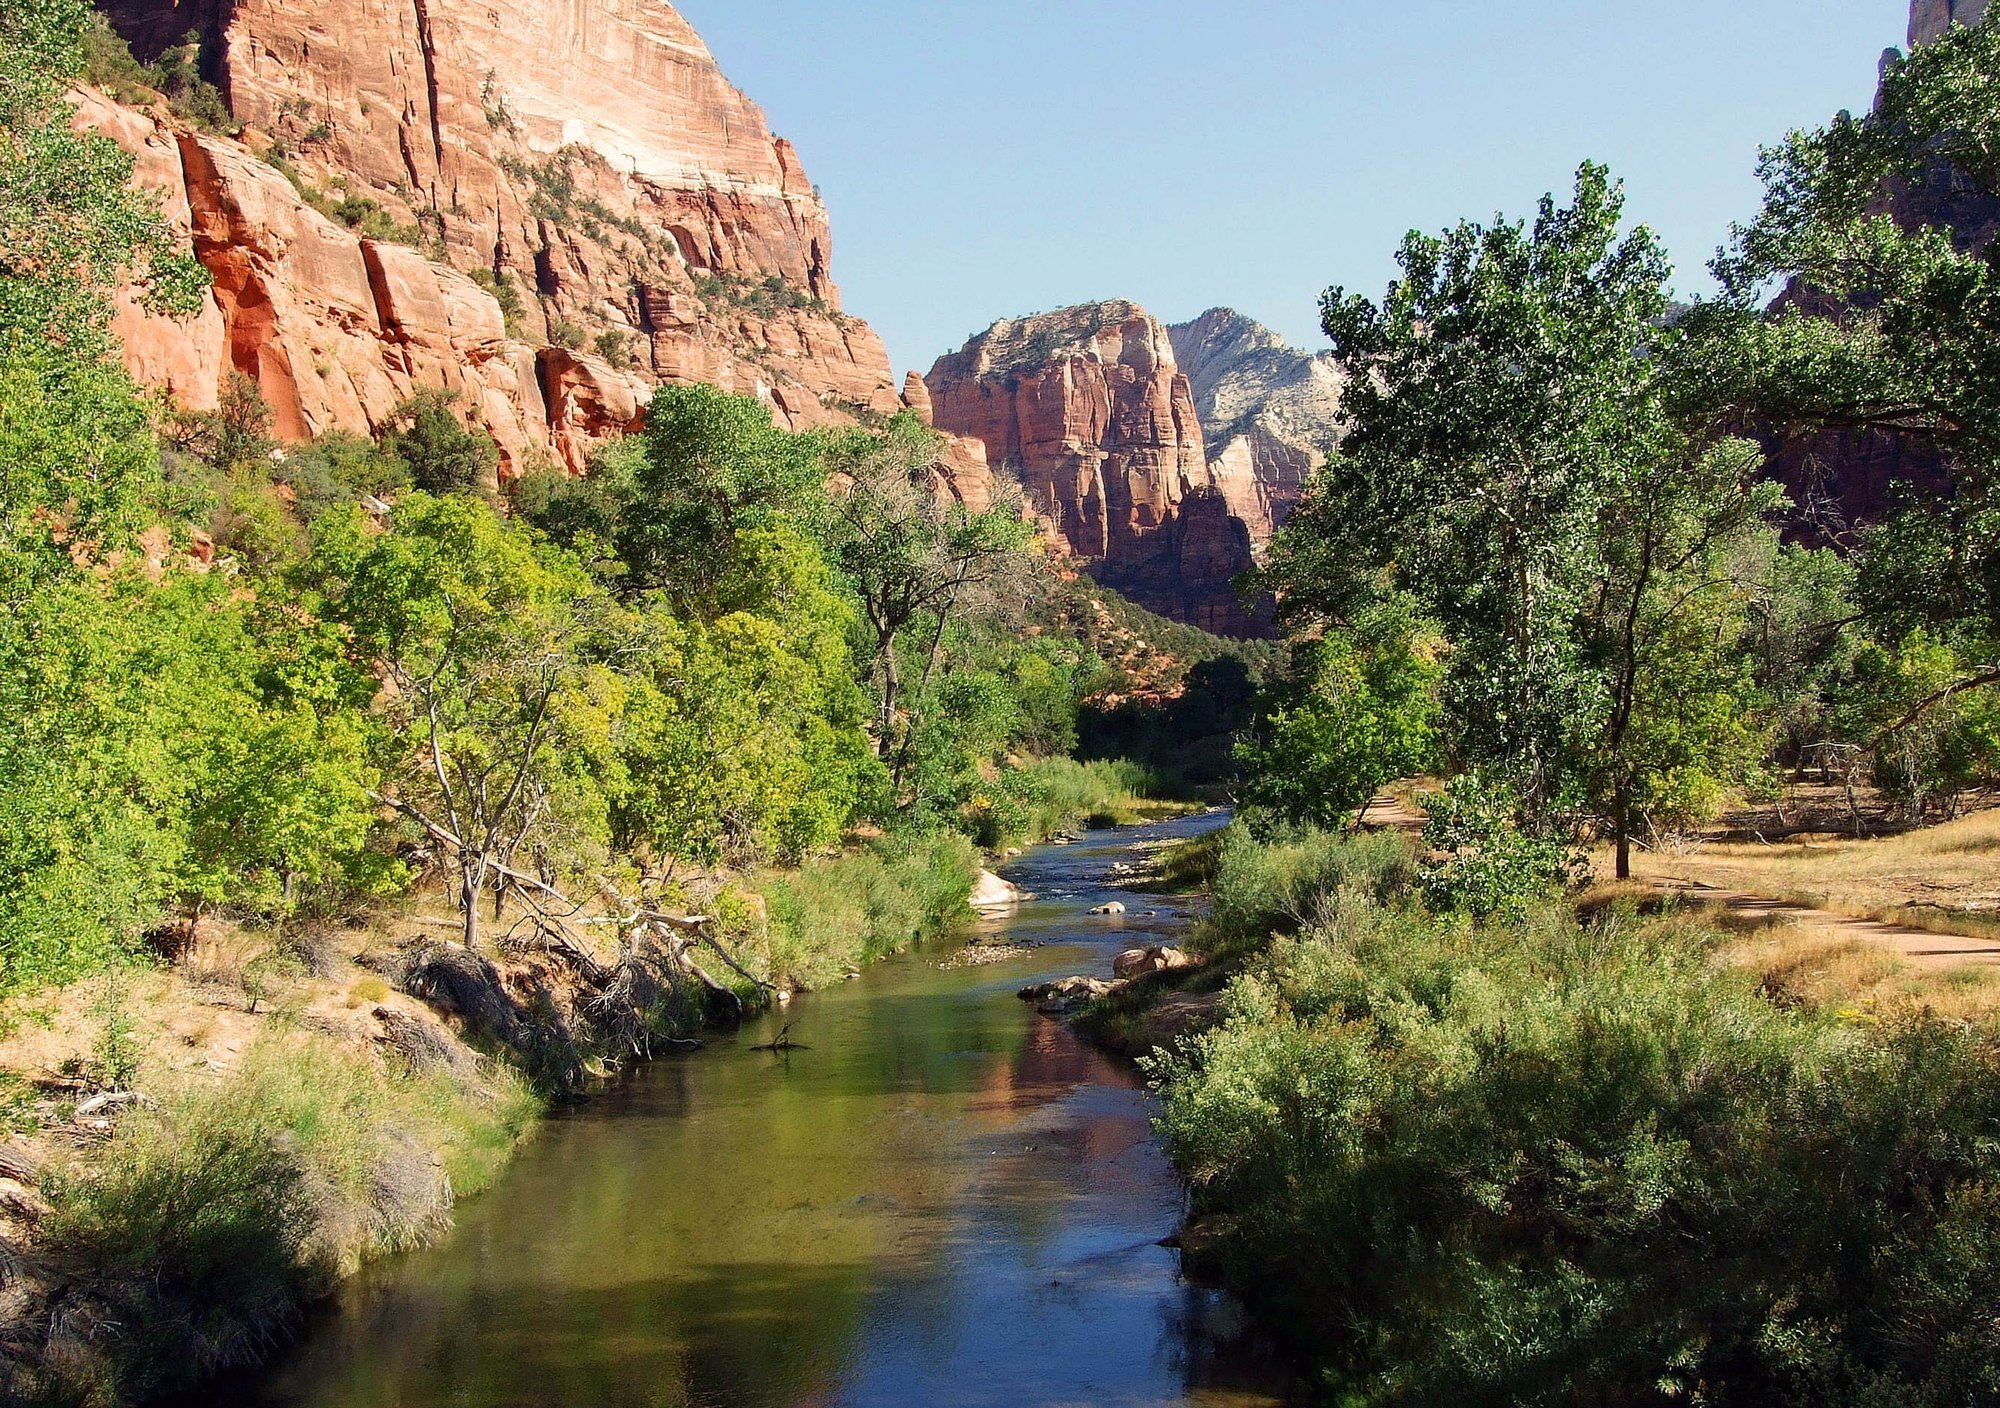
8. Riverside Walk
- Distance: 2.2 miles
- Time Needed: 1 to 1.5 hours
- Elevation Gain: 57 feet
If you can’t do the Narrows Hike, the Riverside Trail is as close as you can get. This beautiful, paved track winds through the Zion Canyon, giving hikers views of the amazing rock walls and “hanging gardens” in the area.
I’d highly recommend the Riverside Walk as a family-friendly place to go hiking in Zion. Since it’s a flat hike that’s paved, it’s a great adventure for beginners and is handicap-accessible. We saw plenty of people here walking with strollers and wheelchairs!
The hike is usually pretty shady, since it’s surrounded by rocks, so be sure bring a light jacket or a sweater before you depart.
You’ll get off the shuttle at the Temple of Sinawava, which is Stop #9. From there, start hiking along the river! There are two paths you can take - the paved one that hugs the rocks, or the sandy trail that borders the river. Choose one or take one out to the end and the other one to return.
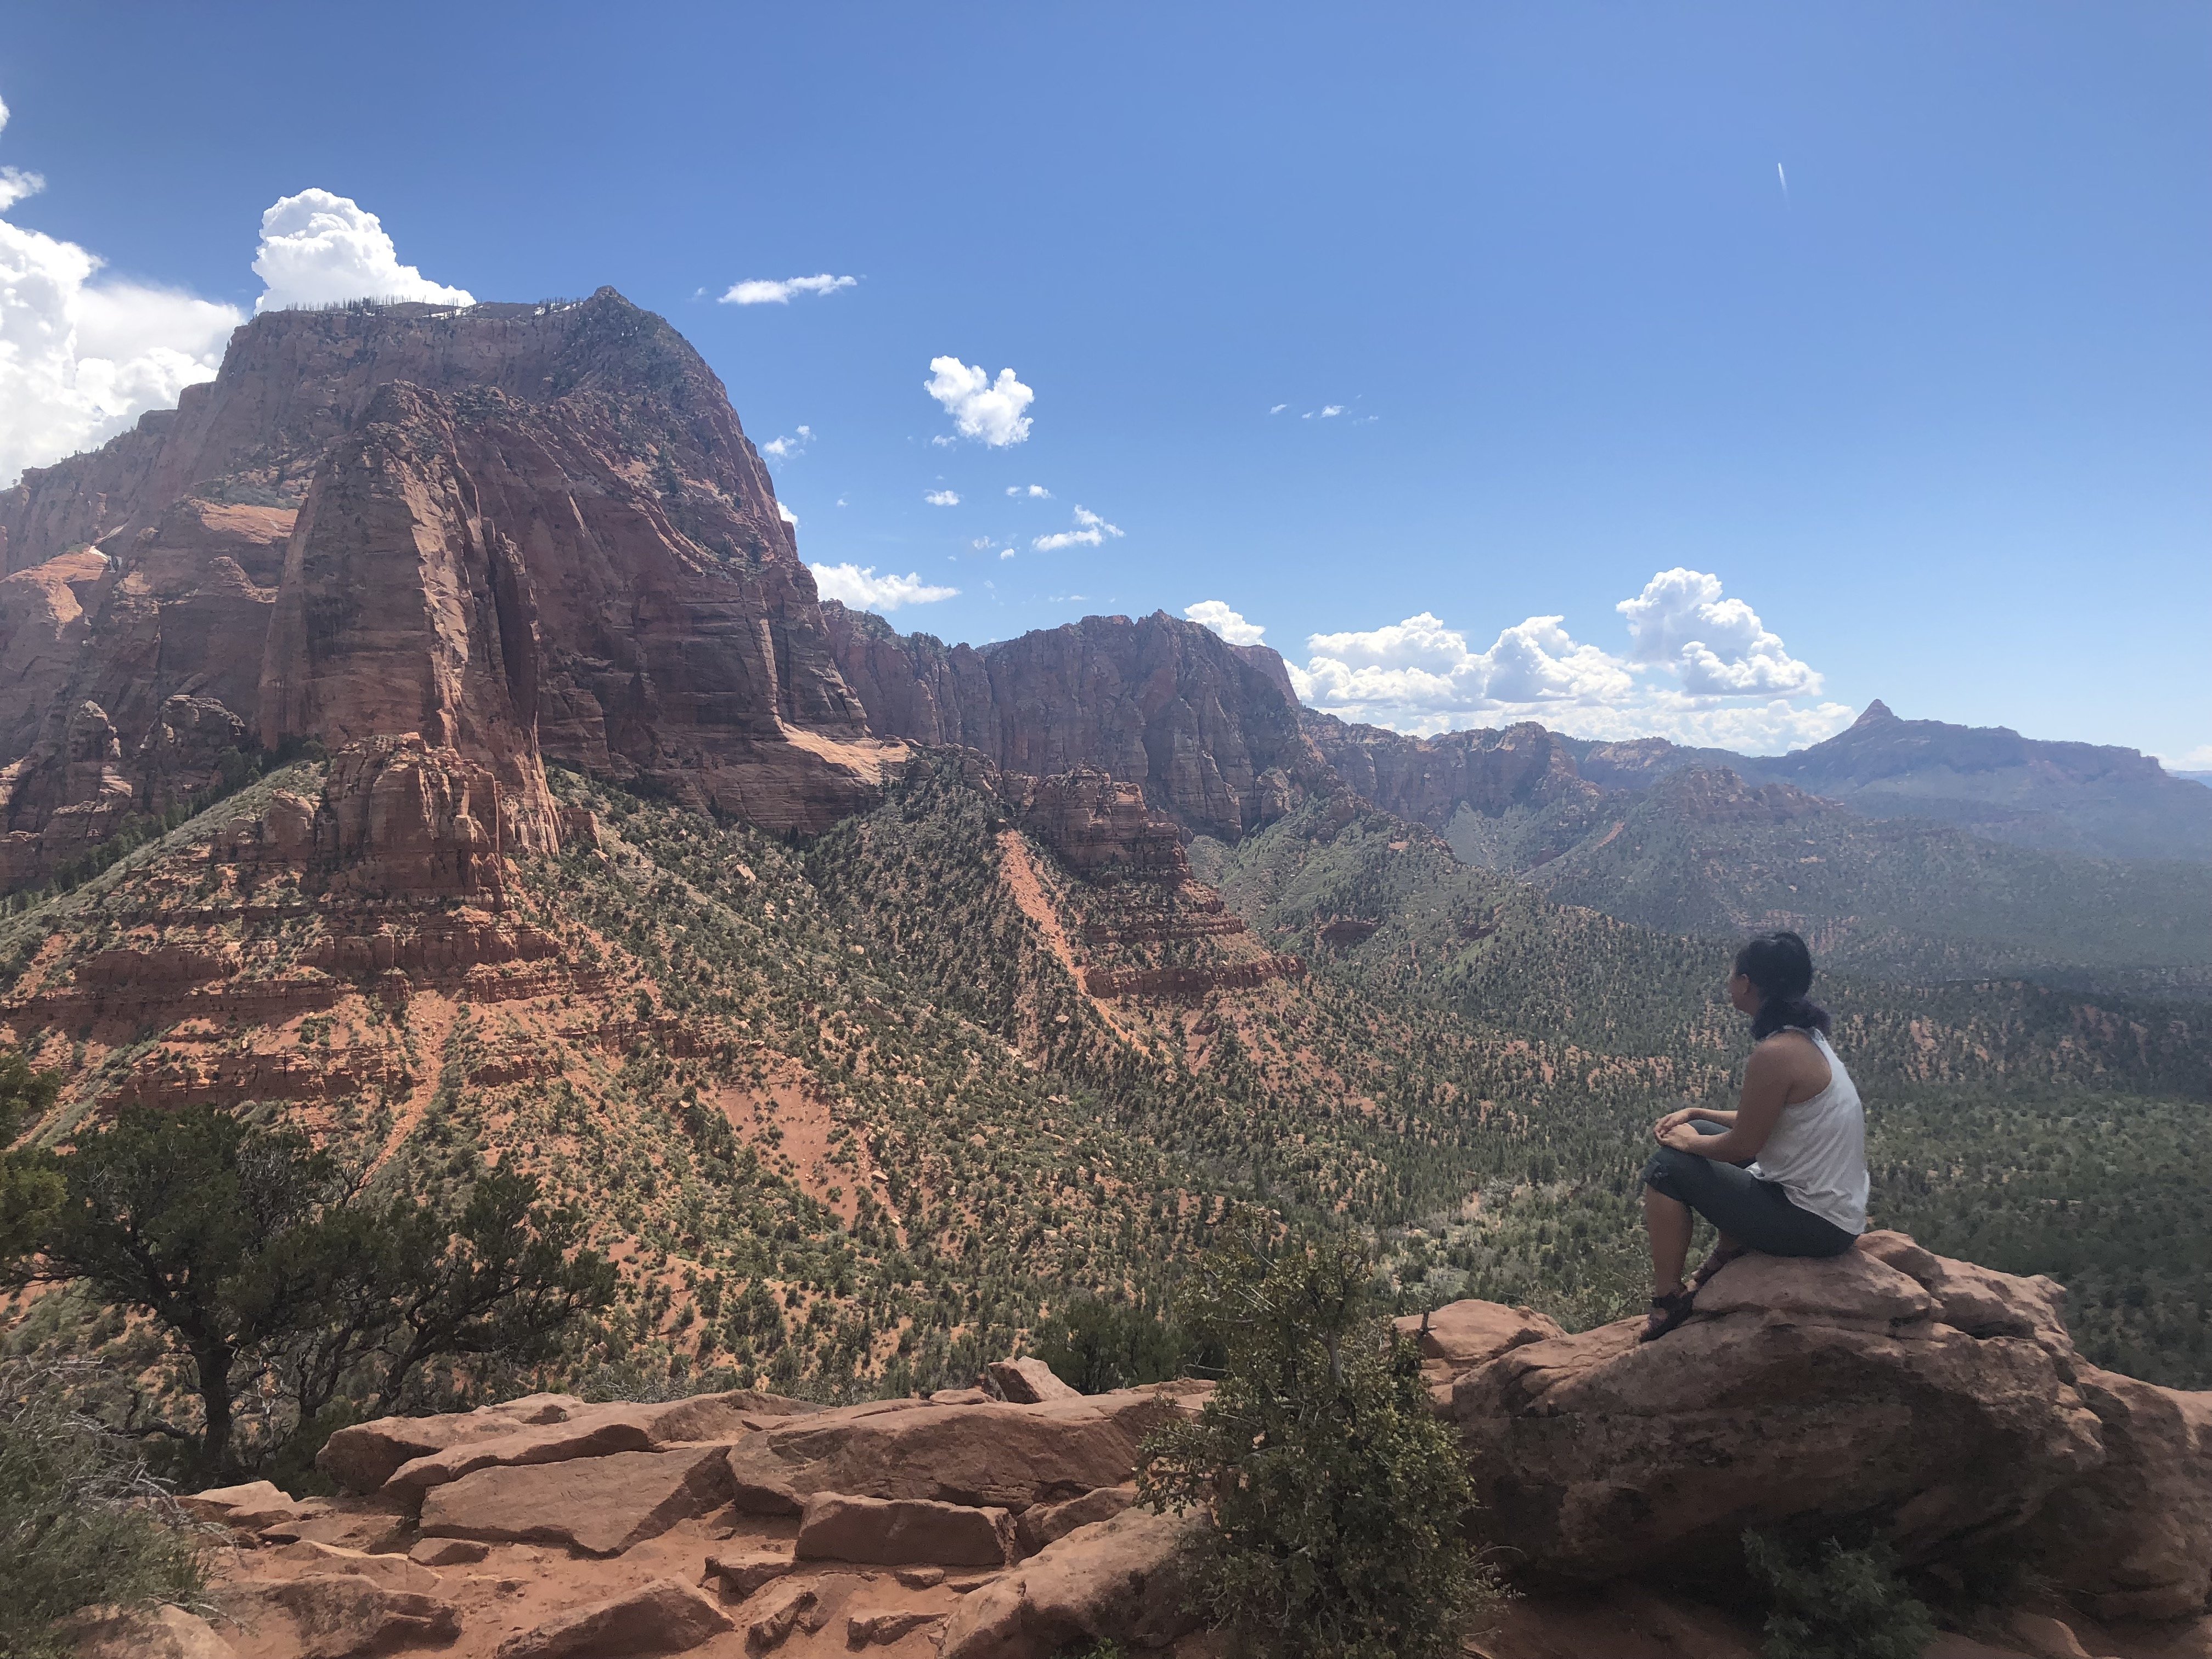
9. Timber Creek Overlook
- Distance: 1 mile
- Time Needed: 30 minutes to 1 hour
- Elevation Gain: 100 feet
Did you know that there’s a whole other area of Zion National Park outside of the main canyon area? It’s called Kolob Canyon and it’s a beautiful, less-crowded area on the west side of the park. The short, easy Timber Creek Overlook hike is one of the best ways to see the Canyon on a time crunch.
With a fairly flat trail, it’s one of the most scenic short hikes in Zion, and is suitable for beginners. When we arrived at the trailhead, we were warned of a rattlesnake hiding behind a boulder, but we luckily didn’t have a run-in with him. With that said, it’s important to note that there is abundant wildlife in the area, so you should be alert at all times.
The trail takes you from the parking area on a path parallel to the ride on the left side. Here, you can see beautiful views of the end of Kolob Canyon. This is a really short hike that will give you a taste of Kolob Canyon’s landscape, and shouldn’t take you more than 30 minutes to an hour to complete.
Moderate Hikes in Zion National Park
10. Lower & Upper Emerald Pools
- Distance: 1.2 miles to Lower Pool, 2.2 miles to Upper Pool
- Time Needed: 1 to 2 hours
- Elevation Gain: 69 to 200 feet
Note: Unfortunately, the Upper Emerald Pools trail is currently closed due to rockfall. However, you can still hike to the Lower Emerald Pool.
If you’re looking for waterfall hikes in Zion, head to one of the most popular trails in the park: the Emerald Pools trail. Here, you’ll find trails that lead up to two sets of waterfalls. The Lower Falls is a dripping fall with trails running underneath, and the Upper Falls is a bit more difficult, taking you up a bit further into the Emerald Pools area.
Depending on how much hiking in Zion you want to do, you have two choices here: you can hike the easy, paved path to the Lower Emerald Falls and return, or continue along the longer, more difficult path to the Upper Emerald Pools.
The first part is handicap/stroller-accessible and waves along a flat, leisurely path. When we were there, the second part of the trail to the Upper Emerald Pools was closed, so we couldn’t continue any more. However, if it’s open while you’re there, you can continue uphill for another half mile to see even more springs and pools.
11. Taylor Creek
- Distance: 5 miles
- Time Needed: 2.5 to 4 hours
- Elevation Gain: 450 feet
Kolob Canyon is actually an excellent place to go hiking in Zion because it’s a LOT less crowded than the central part of the park. If you have a decent chunk of time to explore the Kolob Canyon section a bit more, I’d recommend the Taylor Creek trail.
After hiking the Taylor Creek, we nicknamed it the “trail of a thousand stream crossings,” and if you tackle it, you’ll understand why. You’ll be crossing streams seemingly every other minute! I lost count after a dozen crossings.
The entire trail follows Taylor Creek until you reach a large, cave-like formation in the middle of a narrow section in the canyon. You’ll also pass two historic log cabins along the way.
This moderate trail is only rated as such because of its length and the many stream crossings. To prepare for this hike, make sure you’re wearing water shoes or waterproof hiking boots. Additionally, trekking poles would be especially helpful for the water crossings.
Difficult Hikes in Zion National Park
12. Observation Point
- Distance: 8 miles
- Time Needed: 5 to 7 hours
- Elevation Gain: 2,148 feet
Unfortunately, this trail is currently closed due to rockfall.
Before we came to Zion, people urged us to do the Observation Point hike. Claiming it was maaaaybe the most beautiful hike in Zion, they told us we would love it. Sadly, when we arrived in Zion, we found out the trail was closed to to recent rockfall, so we didn’t get to do it.
However, we did get the scoop from a fellow travel blogger. Here’s what Jessica from Uprooted Traveler told us about her experience on the Observation Point hike:
“Amongst my many travels, I can confidently say that I’ve never been on a hike that has a view that even comes close to comparing to Observation Point, a stunning viewpoint towering at 6,521 feet altitude.
The hike generally begins at Weeping Rock trailhead, with the trail almost immediately changing into unrelenting switchbacks, chiseled out of the red canyon walls and cliffs. As you zig-zag your way to the summit, you will pass through stunning slot canyons and towering white cliffs. The vegetation becomes sparser as you climb higher and higher, but what the trail lacks in greenery, it makes up for with views, offering your first breathtaking glimpses over the park.
After what feels like you’ve been climbing forever (or, to be more specific, about 2100 feet!), the trail will even out and after a mile or so of flat terrain, you’ll reach Observation Point.”
Dang, sounds pretty awesome.
13. Hidden Canyon Trail
- Distance: 2.4 miles
- Time Needed: 1.5 to 2.5 hours
- Elevation Gain: 850 feet
Unfortunately, this trail is currently closed due to rockfall.
The Hidden Canyon Trail is one of the most beloved trails for hiking in Zion because it takes you to a beautiful, secluded canyon off the main drag. While the trail is short - just 2.4 miles round trip - it’s pretty steep. However, for all of the work that you have to do to get there, the views offer a spectacular reward.
Sadly, I didn’t get to do this hike in Zion because it was closed and under repairs. However, hopefully it will be open when you visit Zion, because I’ve heard that this hike is absolutely incredible, and is a local favorite.
After you arrive at Weeping Rock (Stop #7), the Hidden Canyon trail takes you up several switchbacks, through narrow canyon alleys, and finally, to the Hidden Canyon area itself. On the way, you’ll pass an exposed section with chains - hold on tightly and be aware of this if you’re afraid of heights! Once you get to the Canyon, you can explore the area a bit before turning back.
14. East Rim Trail
- Distance: 11 miles
- Time Needed: 7-9 hours
If you’re looking for an epic, long day hike in Zion that’s less crowded than some of the more popular ones, consider the East Rim Trail. This is one of the Zion hiking trails that’s more popular with serious hikers and backpackers, as it’s pretty difficult and requires a full day.
Unfortunately, I didn’t have time to hike the East Rim Trail during my trip to Zion. However, from my research, it looks absolutely beautiful! What hikes love about this trail is that it’s a bit quieter than the main area of Zion, and you’ll get access to some of the most amazing views in the entire park.
The East Rim is a one-way trail that begins at the East Entrance of Zion and extends down to Weeping Rock, which is Stop #7 on the shuttle. You’ll hike through sweeping, bird’s eye trails, narrow canyons, and finally, you’ll end in the main canyon area with views of Angels Landing ahead.
15. West Rim Trail
- Distance: 18 miles
- Time Needed: 1-2 days (overnight backpacking is permitted here)
This is one of the few backpacking trails in Zion, which extends from the main canyon at The Grotto (Stop #6 on the shuttle) to Lava Point on the west side of the park. Because of its difficulty and length, this hike is NOT for beginners and should only be attempted if you have significant hiking and backpacking experience under your belt. While I didn’t get to do this one one my first trip to Zion, it’s SUPER high on my list for next time I visit!
Many visitors choose to hike this as an out-and-back day trip from the main road, but you can also get a backpacking permit and hike it end-to-end over the course of two days. You’ll pass over the top of the rocks to see lots of different canyon views, and you’ll pass by several campsites (for backpacking purposes).
The hike ends at the same trailhead for Angels Landing, where you’ll join the hordes of day hikers ending their scramble to the Angels Landing peak.
Know Before You Go: Zion Hiking & Travel Tips
When to Visit Zion National Park
Zion is a year-round destination and is open 24 hours a day, 365 days a year. That means that choosing the best time to visit Zion National Park is relatively easy. You can hike many of the trails at any time of year, though be aware that trails often close when there’s a lot of rainfall, snow melt, or landslides.
We visited Zion in the spring and had a blast, but lots of trails were closed for maintenance or due to snowmelt/landslides. If we were to come again, we’d probably opt to visit Zion National Park in the early fall, when the weather begins to cool down and the summer crowds subside.
What to Bring for Hiking in Zion
We recommend the following gear for most Zion hiking trails:
- Breathable hiking clothes - For warmer hikes, you’ll want to wear a sweat-wicking shirt and breathable pants, like these Patagonia hiking shorts for men and women. For cold-weather hikes, we recommend dressing in layers, including merino wool baselayers for men and women, a down puffer jacket for men and women, and a Northface waterproof outer shell for men and women (a must for hiking in Seattle). And don’t forget a pair of the best women’s and men’s hiking socks!
- Trekking poles - You won’t need these for every single hike, but we suggest throwing them in your car just in case. We recommend the Black Diamond Trail Ergo cork trekking poles, which are lightweight, easy to transport, and durable.
- Water bottle - Having water available at all times is a huge must. To limit disposable plastic, we recommend bringing your own refillable water bottle. We’re obsessed with Hydro Flask water bottles because they keep water cold for hours.
- Sunscreen and bug spray - Sweatproof sunscreen and DEET bug spray can help you avoid sunburn and bug bites, two of hiking’s most annoying after-effects. Our favorite kind of sunscreen is Sun Bum, as it is free of harsh chemicals and safe for marine life, including coral reefs.
- A brimmed hat or cap - The sun can be brutal in open hikes, so always pack a brimmed hat or cap for day hikes in the sunshine.
- Emergency blanket and first aid kit - We’d strongly recommend bringing a first aid kit and a lightweight emergency blanket on every hike. Why? Because the unfathomable can happen, and it’s always best to play it safe.
- Durable day pack - A durable day pack is the perfect spot to stash all your hiking gear. While any backpack will do, we recommend the Osprey Tempest 20 or the Talon 22 day packs because they’re comfortable and breathable for long hikes. For more information, check out our best day packs for any terrain guide.
Wondering what exactly you should pack for your next hike? Visit our Complete Day Hiking Packing List for our full list and our top gear recommendations.
Where to Stay in Zion National Park
To save money, we stayed in an Airbnb in nearby Hurricane. Hurricane is just 40 minutes from Zion by car, and it has everything you need — a grocery store, restaurants, pharmacy, gas stations, etc.
However, if you’d like to be right next to the park, there are tons of hotels and lodges in Springdale, which is just outside of the park entrance. Fellow travelers really love the Cable Mountain Lodge, stating that the rooms are spacious and clean, and it’s super easy to get into the park.
Related Articles
Did you find this post helpful? Pin it for later!

