Updated June 24, 2025
New Hampshire’s White Mountains are known for being one of the best places for hiking on the East Coast, and the trails here certainly don’t disappoint. Unlike in the flatter areas of the region, White Mountain National Forest is home to dozens of strenuous trails that will challenge even the most experienced hikers. While it can be hard to choose which hikes to do on any given day, one of our absolute favorite trails in the White Mountains is the Welch & Dickey Loop trail, which summits two mountains in just 4.3 miles.
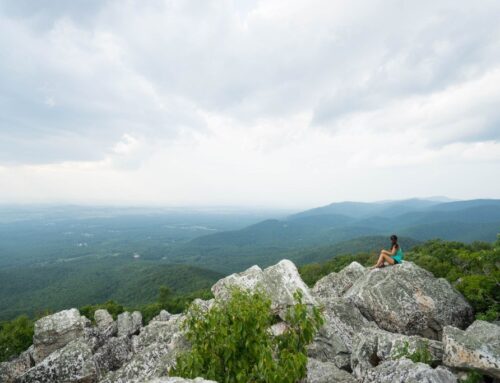
Unlike many of the other strenuous hikes in New Hampshire, the Welch & Dickey Loop trail is on the shorter side and can be done in half a day or less. This means you can easily combine this hike with another one nearby, or simply take your time making your way up the rocky inclines and admiring the views from the top. Either way, you’ll find gorgeous, panoramic views from this scenic trail that will show you just how gorgeous the White Mountains are.
The Welch Dickey Loop Trail: An Overview
Named after the two peaks you’ll summit along the trail, the Welch & Dickey Loop is a moderate to challenging hike that’s best done in the fall for views of the foliage and colors all around the White Mountains. While the trail is rated as difficult, it’s a great step-up trail for hikers wanting to gain more experience with rock scrambling and summit hiking. Just make sure you wear solid hiking boots and follow our “things to know” tips below for a safe and fun hiking experience.
Here’s a quick snapshot of the Welch Dickey Loop trail:
- Trail Distance: 4.3 miles
- Elevation Gain: 1,774 feet
- Estimated Completion Time: 3-4 hours (It took us 3.5 hours to complete the full loop with several stops for photos!)
- Difficulty: Moderate to Difficult
- Dog friendly? Yes, for active dogs who can climb up moderate rock scrambles
- Parking: There’s a designated parking lot at the trail head that has several spots, but it fills up quickly, especially on weekends. If you do not find a spot in the lot, street parking is available but be sure not to park in an area marked with a “No Parking” sign.
Things to Know Before Hiking the Welch Dickey Loop
This trail is well-marked and easy to follow, but there are a few things I wish I knew before embarking on the Welch Dickey Loop trail:
- Do not do this trail if it is raining or has rained recently. There are a lot of slippery sections on the rocks that form the trail that can be dangerous when wet. Ideally, you’ll want to go on this trail on a sunny, dry day with low chances of precipitation. Check the forecast before you go to ensure that you’ll have dry weather!
- The best time to hike the Welch & Dickey loop is in the fall. While this is technically a four season trail, the views from the top of both mountains are most stunning in the fall. The entire surrounding valley turns shades of yellow, orange, and red, and it’s quite a beautiful spectacle to see from above.
- We recommend doing this loop counter-clockwise. This way, you’ll be scaling the potentially slippery rocks rather than descending with them, making it easier for you as you go down the mountainside on the back half of the hike.
- After periods of rain, the trail can get quite muddy. Wear waterproof hiking boots with wool hiking socks to keep your feet warm and dry as you hike, and watch your step in the forested areas to avoid sticking your foot into deep mud!
- Protect yourself against ticks and be sure to check yourself post-hike. Maine has lots of ticks in its forests and, as the trail is mostly forested, it’s important to protect yourself. Spray your hiking clothes with permethrin spray, use bug spray with DEET on exposed areas of skin, and always do tick checks on yourself, your hiking partners, and your dogs after you complete your hike.
How to Hike the Welch & Dickey Loop Trail: Our Review
Beginning the Welch & Dickey Loop
My sister and I decided to do this hike in mid-October after crossing over to New Hampshire from Maine. When we arrived at the trail head, the parking lot was already full, so we parked around the corner from the exit and walked the short distance to the trail head. Within 10 minutes of leaving the car, my sister found a tick on her sweatshirt, so we were on high alert for ticks the rest of the day.
In case you need it, there’s a bathroom in the parking lot area as well as an information station. The trail is pretty straightforward, but it’s always good to be prepared and plan out where you’re going.
At the trail head, there are two ways you can go - left to Welch or right to Dickey. We opted to go right in the counter-clockwise direction and were glad we did. Immediately after taking the right hand trail, there’s a small stream crossing. You can use the rocks to cross the stream, but it may require some footwork/jumping.
Summiting Dickey Mountain
After crossing the stream, the beginning of the hike was quite easy. It was a moderate uphill on dirt pathways that threaded through the trees. It had snowed the day before we arrived, so many of the trail areas were muddy on the ascent.
We found ourselves a little bit surprised at how easy the ascent felt, and eventually we ended up at a rocky viewpoint that gave us our first glimpses at the New Hampshire/White Mountains foliage from above.
From the viewpoint, we pushed onwards to the summit of Dickey Mountain, the first of the two mountains we’d climb. This part was a bit more strenuous, with some exposed rock areas and a little bit of scrambling required to get to the top.
Our dogs were fine, except for a couple of instances where we had to push them up rocks. Within minutes, we arrived at the Dickey Mountain summit, which had really incredible 360 degree views of the area below, as well as a direct line of sight to our next destination, the summit of Welch Mountain.
Onward to Welch Mountain & the Descent
After summiting Dickey, we had to traverse the saddle between the two mountains. This required a bit of downhill hiking first, which was quite steep and rocky. We didn’t have any disastrous spills, but we had to watch our step and keep the dogs close as we descended the first summit.
Once we got to the saddle area, the terrain changed drastically. Rocky trails turned into pathways of soil and pine needles, and the ascent became gradual and leisurely once again. The whole trail was shaded by pine trees, which made for a beautiful, tranquil experience as the sun shone through them.
Eventually, we hit more rocks and we knew the summit of Welch Mountain had to be nearby. Some more scrambling and tricky boulders to climb greeted us, and for a while, we had to be extra careful of slipping (the rocks were slightly wet from the previous day’s snowfall). A few times, both my sister and I actually slipped on the rocks, which was terrifying but somewhat expected.
Getting to the top of Welch Mountain was just as magical as Dickey. Again, we got gorgeous views of the valleys and highways below, with large boulder areas to sit on and relax for a bit before descending back down the rest of the loop.
Just after beginning the descent, we stumbled upon a viewpoint that was easily our favorite of the entire hike. It just goes to show that sometimes, the best parts of a hike are not the destinations!
The descent was slightly steep at parts, so if your knees get irritable like mine do on steep downhills, I’d recommend trekking poles for support. Again, you’ll walk through the forest for about 1.5 miles until you reach the parking lot once again. Enjoy the cool-down period this canopy provides - I know my sister and I definitely did!
Additional Resources for Hiking in New Hampshire
What to Bring
- Breathable hiking clothes - For warmer hikes, you’ll want to wear a sweat-wicking shirt and breathable pants, like these Patagonia hiking shorts for men and women. For cold-weather hikes, we recommend dressing in layers, including merino wool baselayers for men and women, a down puffer jacket for men and women, and a Northface waterproof outer shell for men and women (a must for hiking in Seattle). And don’t forget a pair of the best women’s and men’s hiking socks!
- Trekking poles - You won’t need these for every single hike, but we suggest throwing them in your car just in case. We recommend the Black Diamond Trail Ergo cork trekking poles, which are lightweight, easy to transport, and durable.
- Water bottle - Having water available at all times is a huge must. To limit disposable plastic, we recommend bringing your own refillable water bottle. We’re obsessed with Hydro Flask water bottles because they keep water cold for hours.
- Sunscreen and bug spray - Sweatproof sunscreen and DEET bug spray can help you avoid sunburn and bug bites, two of hiking’s most annoying after-effects. Our favorite kind of sunscreen is Sun Bum, as it is free of harsh chemicals and safe for marine life, including coral reefs.
- A brimmed hat or cap - The sun can be brutal in open hikes, so always pack a brimmed hat or cap for day hikes in the sunshine.
- Emergency blanket and first aid kit - We’d strongly recommend bringing a first aid kit and a lightweight emergency blanket on every hike. Why? Because the unfathomable can happen, and it’s always best to play it safe.
- Durable day pack - A durable day pack is the perfect spot to stash all your hiking gear. While any backpack will do, we recommend the Osprey Tempest 20 or the Talon 22 day packs because they’re comfortable and breathable for long hikes. For more information, check out our best day packs for any terrain guide.
Wondering what exactly you should pack for your next hike? Visit our Complete Day Hiking Packing List for our full list and our top gear recommendations.


